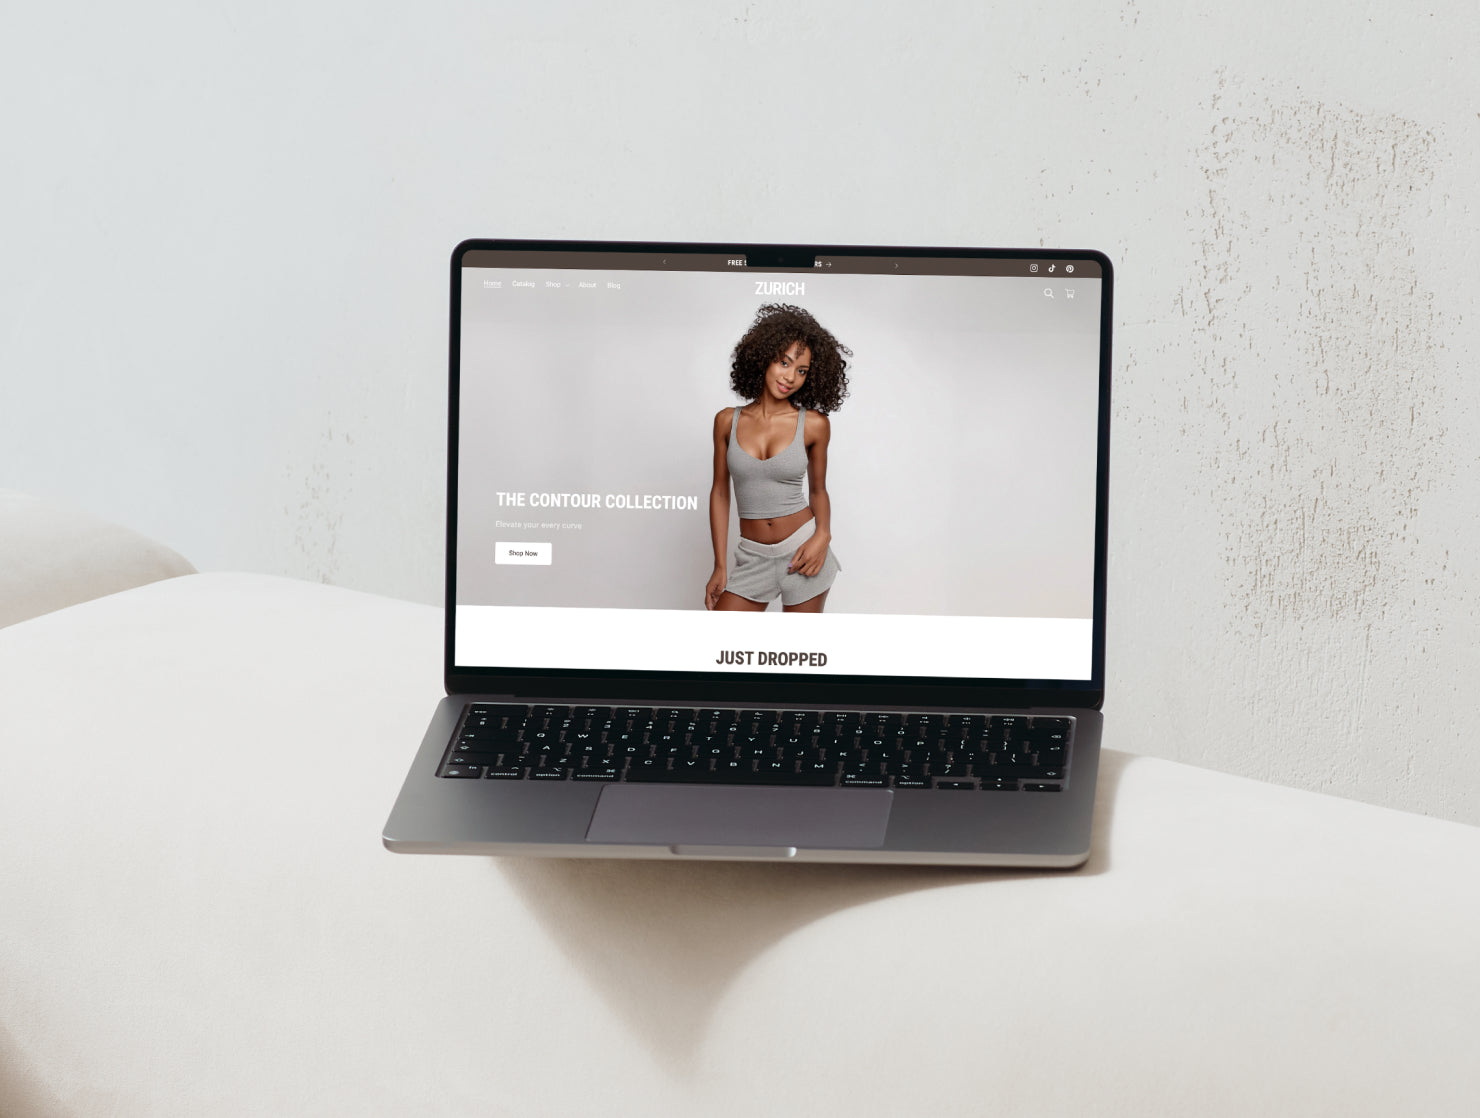
SHOPIFY Theme Setup
Our Shopify themes are extremely customisable and fully responsive. Here is a guide on how to get started. For questions or customisation requests: hello@studiomayde.com
Your ultimate checklist
Shopify LAUNCH GUIDE
We’ve put together the ultimate guide to ensure your store launch is smooth and hassle-free. It covers everything you need, from setting up the backend of your store—like domains, taxes, payments and marketing—to kickstarting your launch.
Customisation PROCESS
Got our theme and wondering what's next? Here's our personal process to get started with customising our themes!
Collapsible content
1. Add in your products
After you’ve uploaded your theme into Shopify, we like to kick off the customization process by adding your products first. This gives you a solid foundation to work with and makes it easier to tailor the design around real content. If you’ve got a large inventory, just start by loading 4-10 products to get the ball rolling.
How to add products
Scroll to: Shopify account setup > Adding and updating products
How to create product collections
Scroll to: Shopify account setup > Create product collections
2. Set Up Your Navigation
Next, let’s set up all the pages for your website. Organize your menu so customers can easily navigate your store. This step will help you create a clear structure or wireframe for your site. By doing this before diving into the design of each page, you’ll be able to start linking each page as you build out your site as you go.
Key pages we suggest you create:
- About Us
- Contact Us
- FAQ
- Privacy Policy
- Terms and Conditions
- Shipping and Returns
- Testimonials/Reviews
- Store Locator
*Your Cart, Check Out, Blog, Product, Collection and Homepage pages are automatically included and linked within our theme, so you will not need to manually create a page for these.
How to add a page
Scroll to: Customising your store > Add Page
Link our theme template page to your page
Scroll to: Customising your store > Link Template to a Page
Setup your navigation bar
Scroll to: Customising your store > Navigation menu items
3. Design your pages
Here’s our step-by-step process for customizing your Shopify theme:
1. Access Your Theme Editor:
From your Shopify dashboard, go to "Online Store" and click on the theme you want to customize by selecting "Customize."
This will open your website on the homepage in the theme editor.
2. Start with Theme Settings:
Begin by exploring the Theme Settings where you can adjust global styles like colors, typography, and layout.
We recommend setting your brand colors and fonts first to ensure a consistent look throughout your store.
3. Edit Your Homepage:
Next, focus on editing your homepage. This is typically the first page your customers will see, so it’s important to make sure it contains all the key information.
By starting with the homepage, you can easily add and adjust content as you go along, ensuring nothing important is overlooked.
4. Configure Your Footer:
After the homepage, scroll down to the footer section in the theme editor.
We suggest adding links to important pages, social media icons, and other relevant details like store hours or a newsletter signup. The footer is a vital area for additional navigation and customer engagement.
5. Update the Remaining Pages:
Finally, customize the rest of your pages. Here’s the order we personally recommend:
- Homepage
- About Us page
- Product Pages
- Collection Pages
- FAQ page
- Contact page
- Blog Pages
- Any other pages you may have
How to change theme styling
Scroll to: Theme Settings
How to customise your page sections
Scroll to: Customising your store
4. Install apps or integrations
Our themes are designed to be highly customizable and compatible with most apps available in the Shopify App Store or third-party providers, allowing you to enhance your website's functionality. Here are a few integrations we recommend to get you started:
- Shopify App Store: Explore the Shopify App Store to add new features to your store, such as email marketing, SEO optimization, and customer reviews.
- Analytics: Install tools like Google Analytics and Facebook Pixel to track visitor behavior and run targeted ads, helping you make informed, data-driven decisions.
How to integrate Google Analytics to your store
Scroll to: Launch your store > Integrate Google Analytics
5. Your launch checklist
Here is our personal checklist: https://www.studiomayde.com/pages/launch-guide-with-shopify
Once you’ve made your edits, we highly recommend previewing your store on various devices to ensure it looks amazing on desktops, tablets, and smartphones.
Be sure to test all navigation, links, and interactive elements to make sure everything is functioning smoothly. A seamless user experience is key to keeping customers engaged.
After you’ve reviewed everything and are happy with the results, save your changes and publish the theme when you’re ready to launch!
How to GUIDES
Shopify Account Setup
Setting up a Shopify Account
You can now try Shopify free for 3 days, no credit card required! Sign up using our link below to unlock all the premium features.
Open your web browser and navigate to https://www.shopify.com/.
Then, provide your email address to begin the signup process.
Upload Theme
After buying our theme, please download the zip file within the access PDF.
To upload the theme to Shopify:
- Access your Shopify admin panel.
- Navigate to Online Store > Themes.
- Choose "Add Theme" > "Upload zip file" > "Add File" button.
- Select the zip file from the access PDF (do not unzip the file) and click "Open" to upload the file.
- Once the theme is uploaded, click 'Customize Theme' to customize your store.
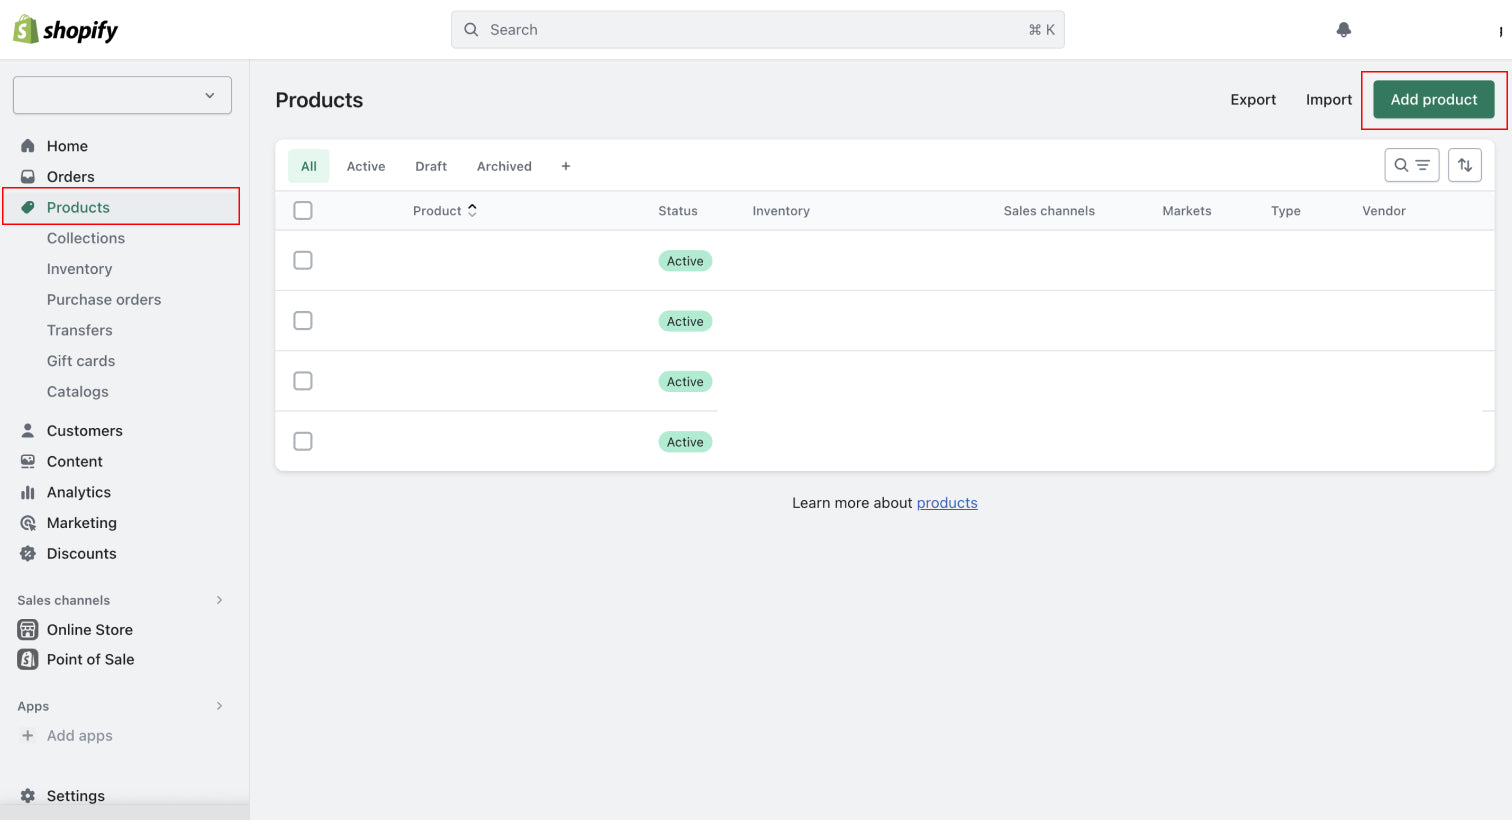
Adding and updating products
Adding and updating product information
To add or update a product in Shopify, follow these simple steps:
- Access your Shopify admin panel.
- From the dashboard, go to Products.
- On the Products page, click "Add product."
- Enter a title for your product and fill in the additional details as required.
- Click "Save."
Create product collections
How to group products into a collection:
To group products into a collection in Shopify, follow these steps:
- Access your Shopify admin.
- Go to Products > Collections.
- Click "Create collection."
- Enter a title and description for the collection.
- In the Collection type section, choose a condition rule/s.
- Click "Save."

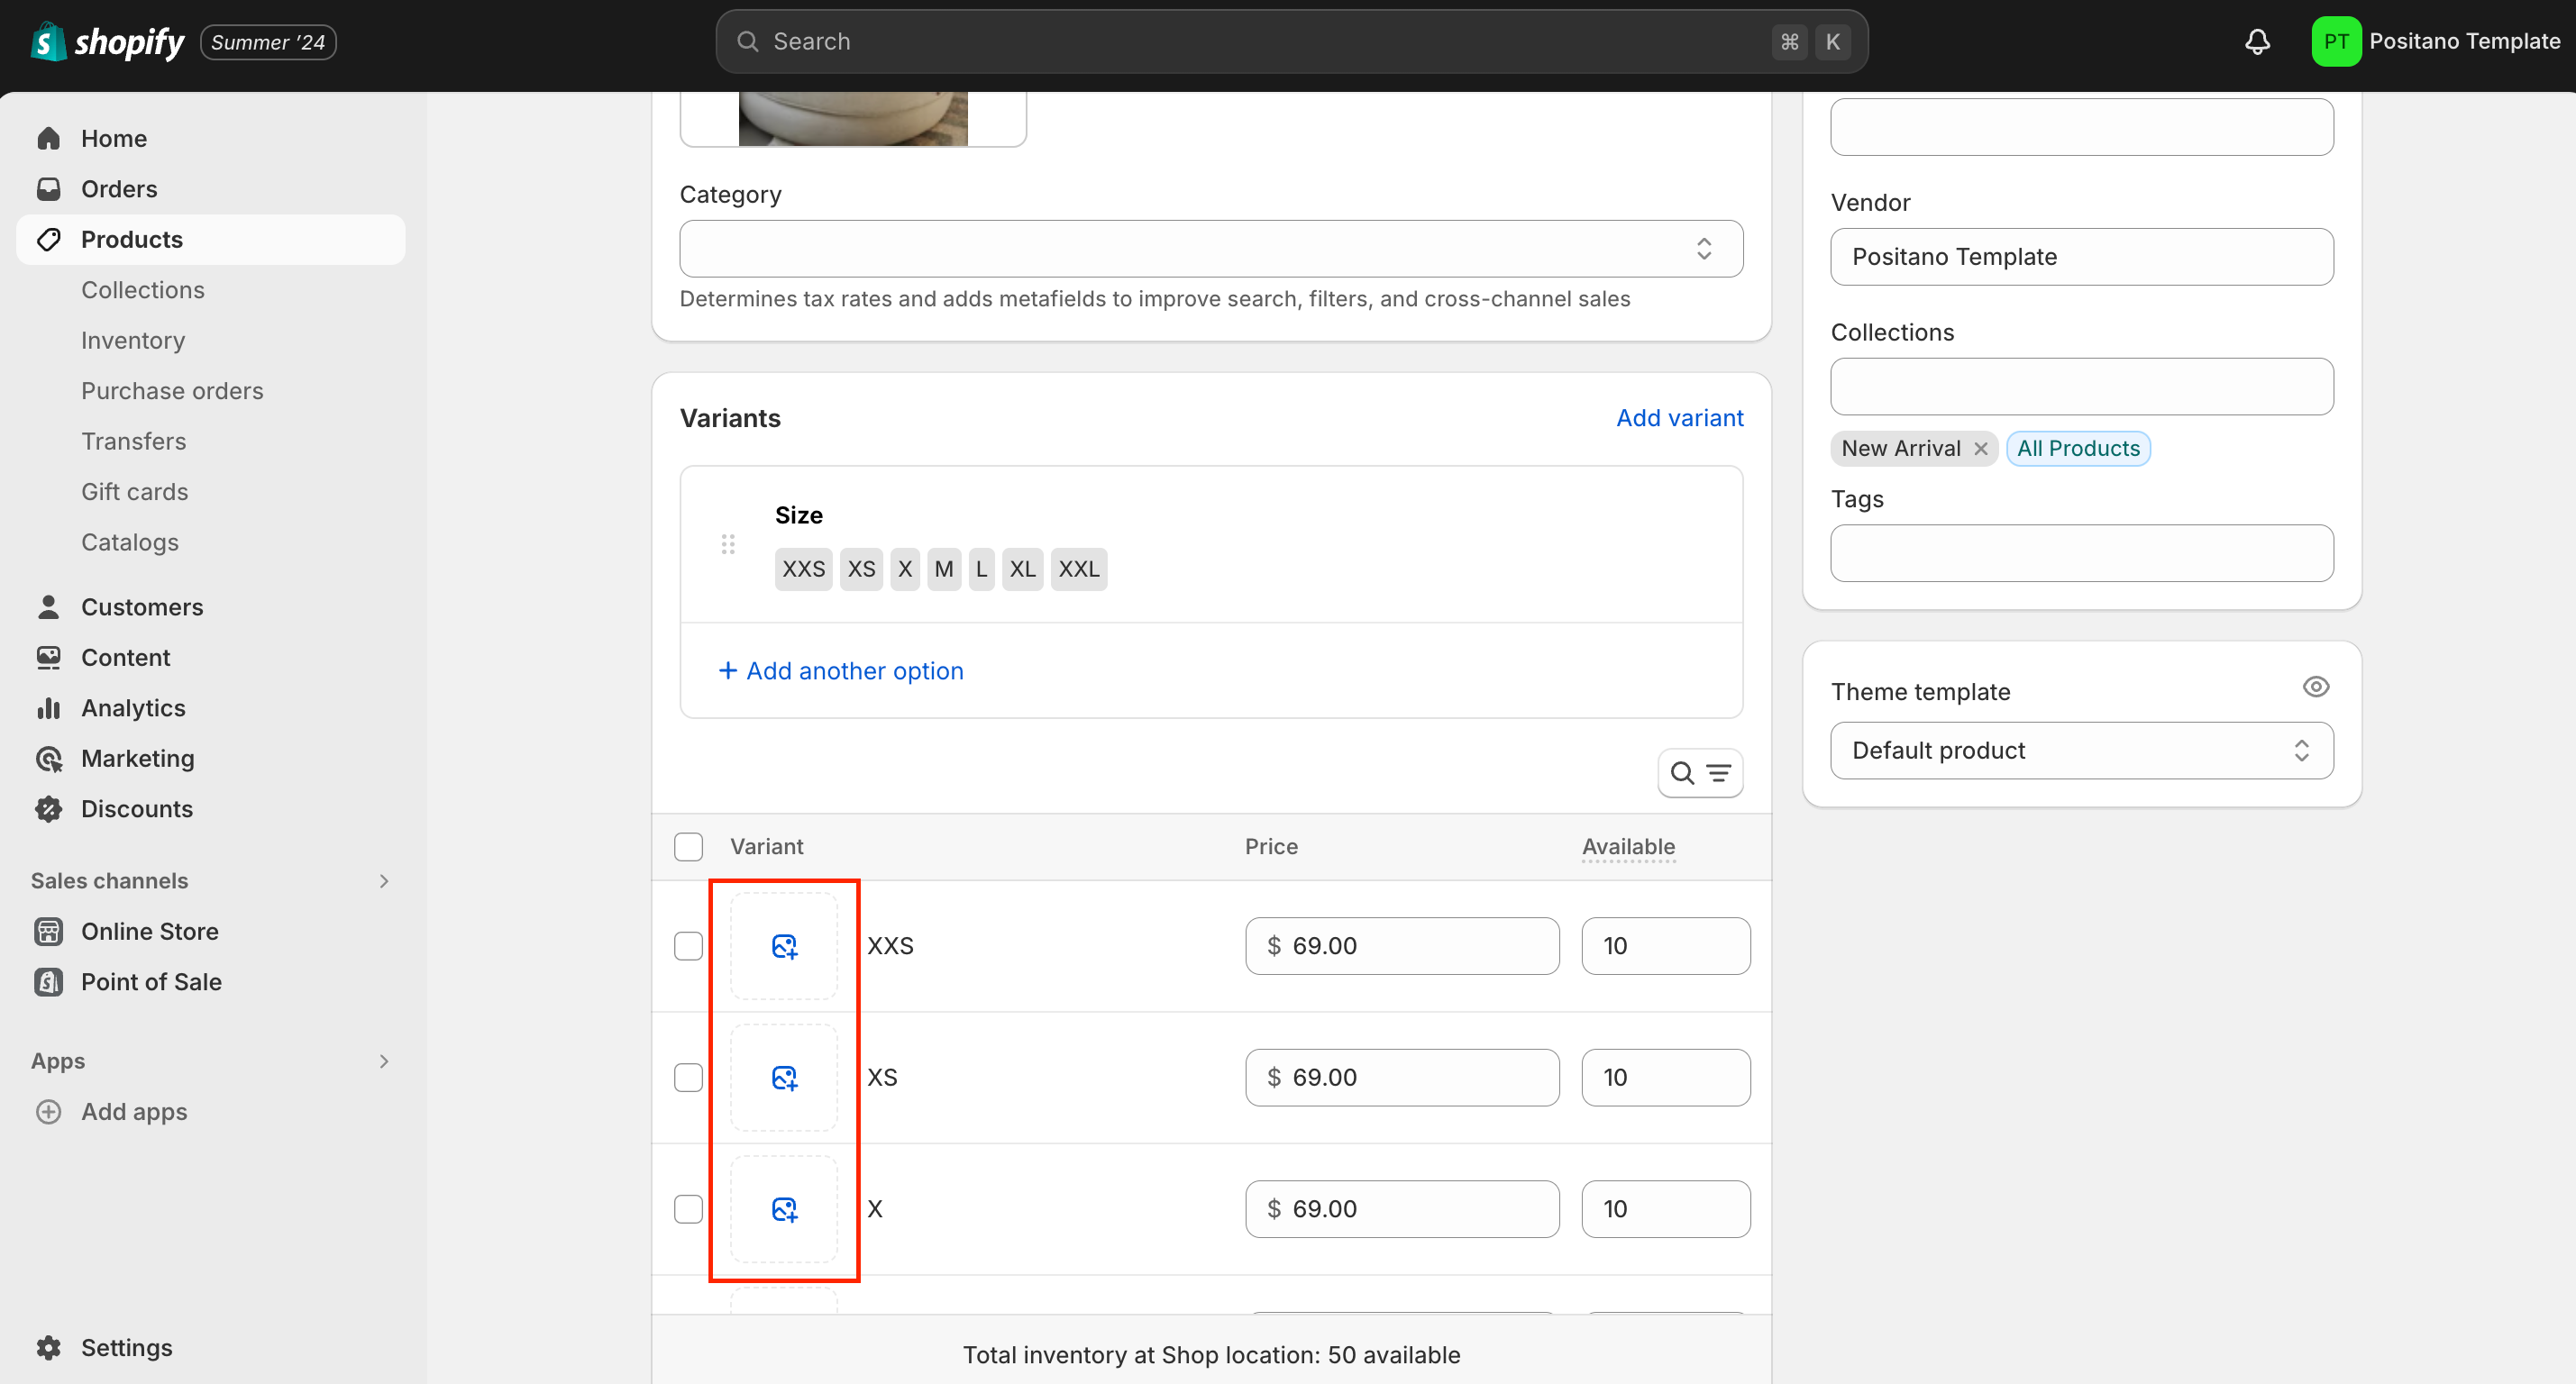
Link product image to a variant
- In the dashboard, go to Products and select the product to edit.
- In the Variants tab, list the product colors under Option Values and click Done.
- Click the photo icon next to each variant.
- Select the corresponding photo for each variant.
- Click Save.
Store Settings
Link domain URL
To link your domain to your Shopify store, follow these steps:
- Access your Shopify admin panel.
- Navigate to Settings > Domains.
- Select "Connect existing domain."
- Input your domain, for example, johns-apparel.com.
- Click the "Next" button.
- To ensure that your domain is successfully linked to your Shopify store, click on "Verify connection."
Currency
To modify your store currency in Shopify, follow these steps:
- Access your Shopify admin panel.
- Go to Settings > Store details.
- Locate the "Store currency" section and choose your desired currency from the available options.
- Once you've made the necessary changes, click the "Save" button to apply the new currency setting.

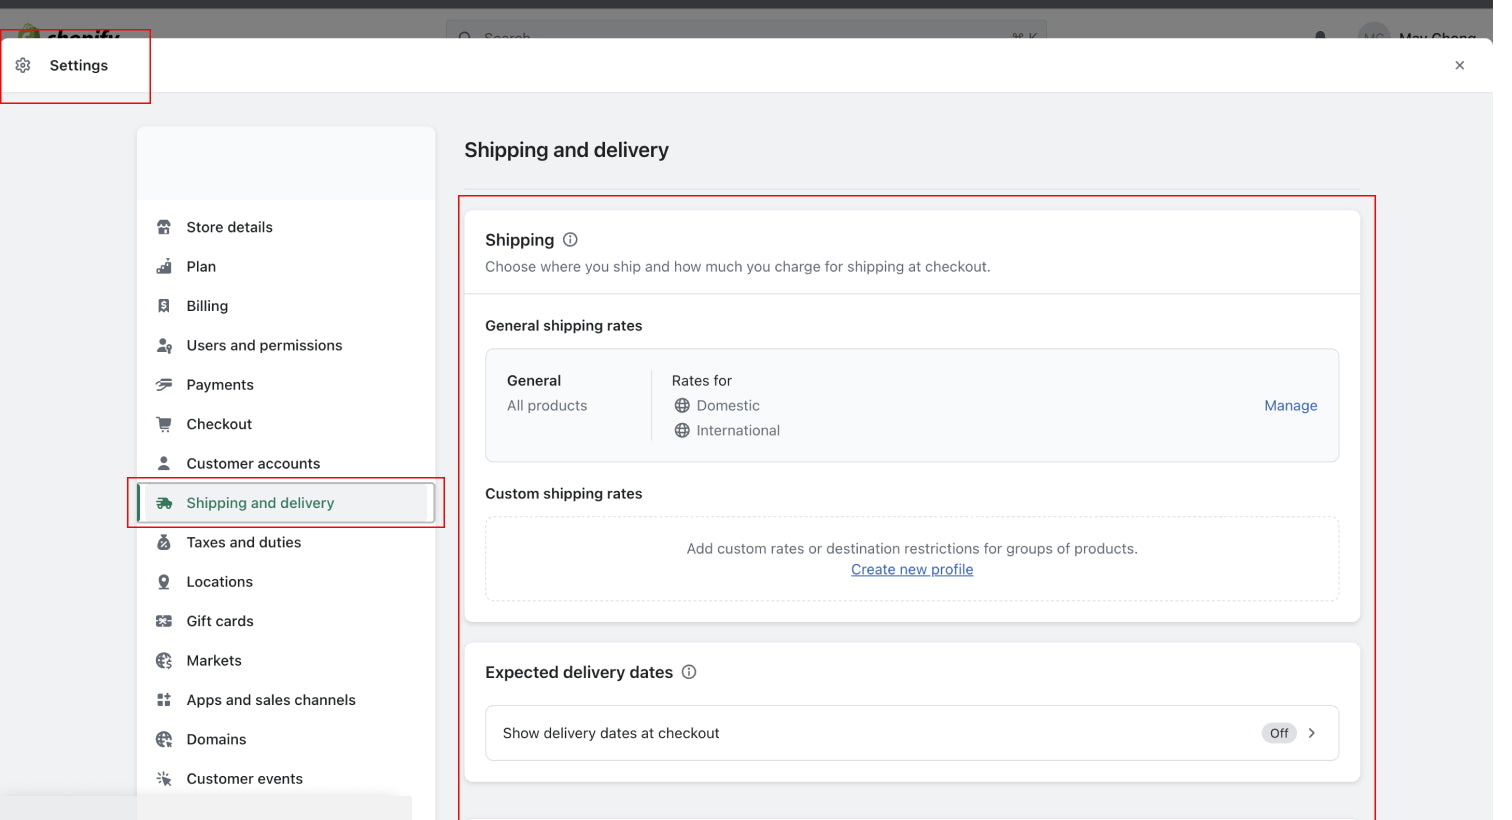
Shipping
Shipping
To configure shipping settings, follow these steps:
- Access your Shopify admin panel.
- Go to Settings > Shipping and delivery.
- In the Custom shipping rates section, select "Create new profile."
- Provide a name for the profile to identify it.
- Set up your Taxes and Duties settings in the next section.
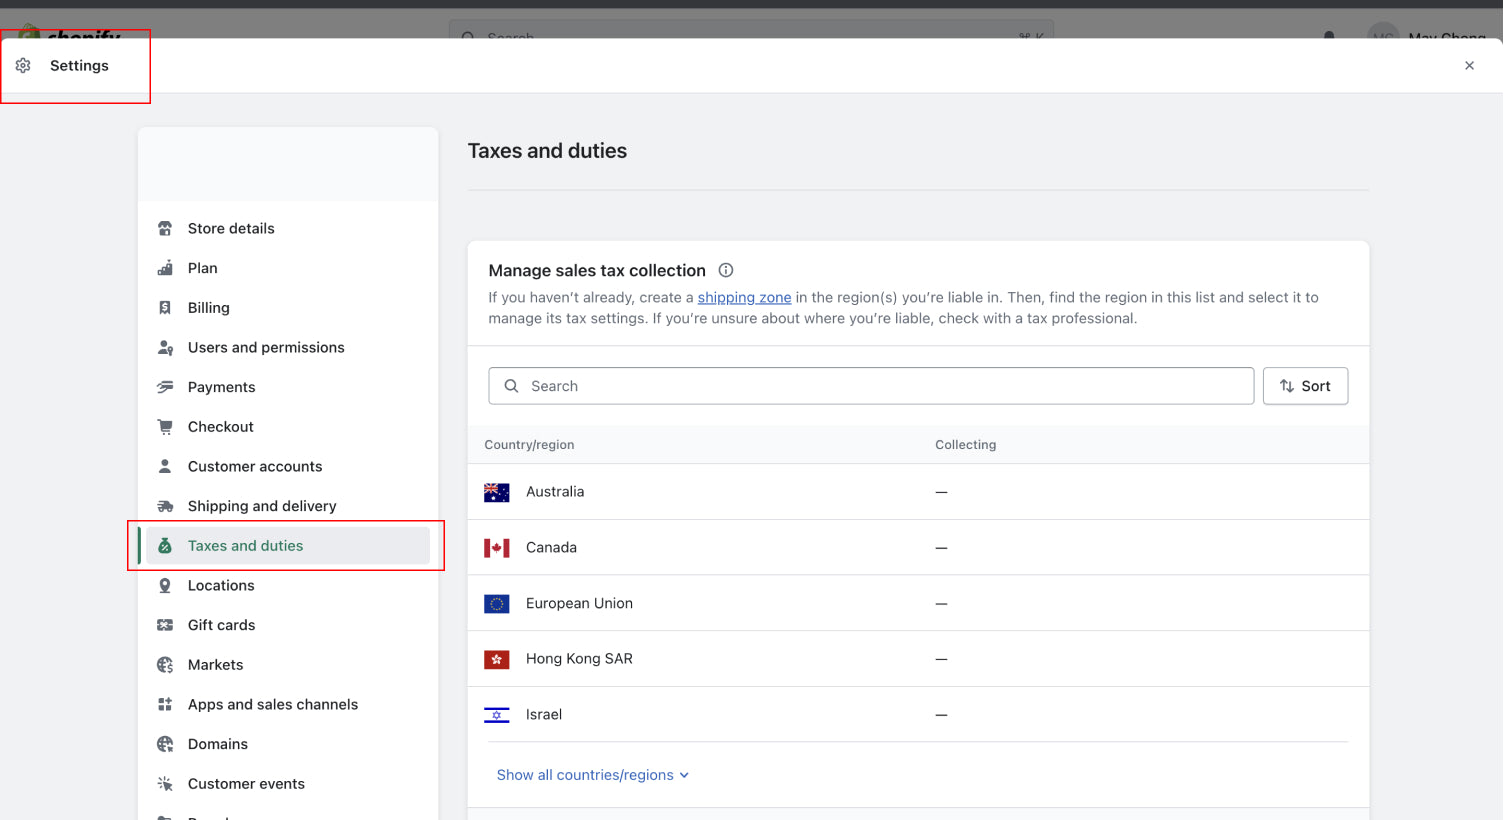
Taxes and Duties
Taxes and duties
To configure duties and import taxes settings in Shopify, follow these instructions:
*Your shipping zones must be setup to proceed
- Access your Shopify admin panel.
- Navigate to Settings > Taxes and duties.
- In the Duties and import taxes section, click on "Set up."
- Choose the specific shipping countries or regions where you wish to collect duties and import taxes during the checkout process.
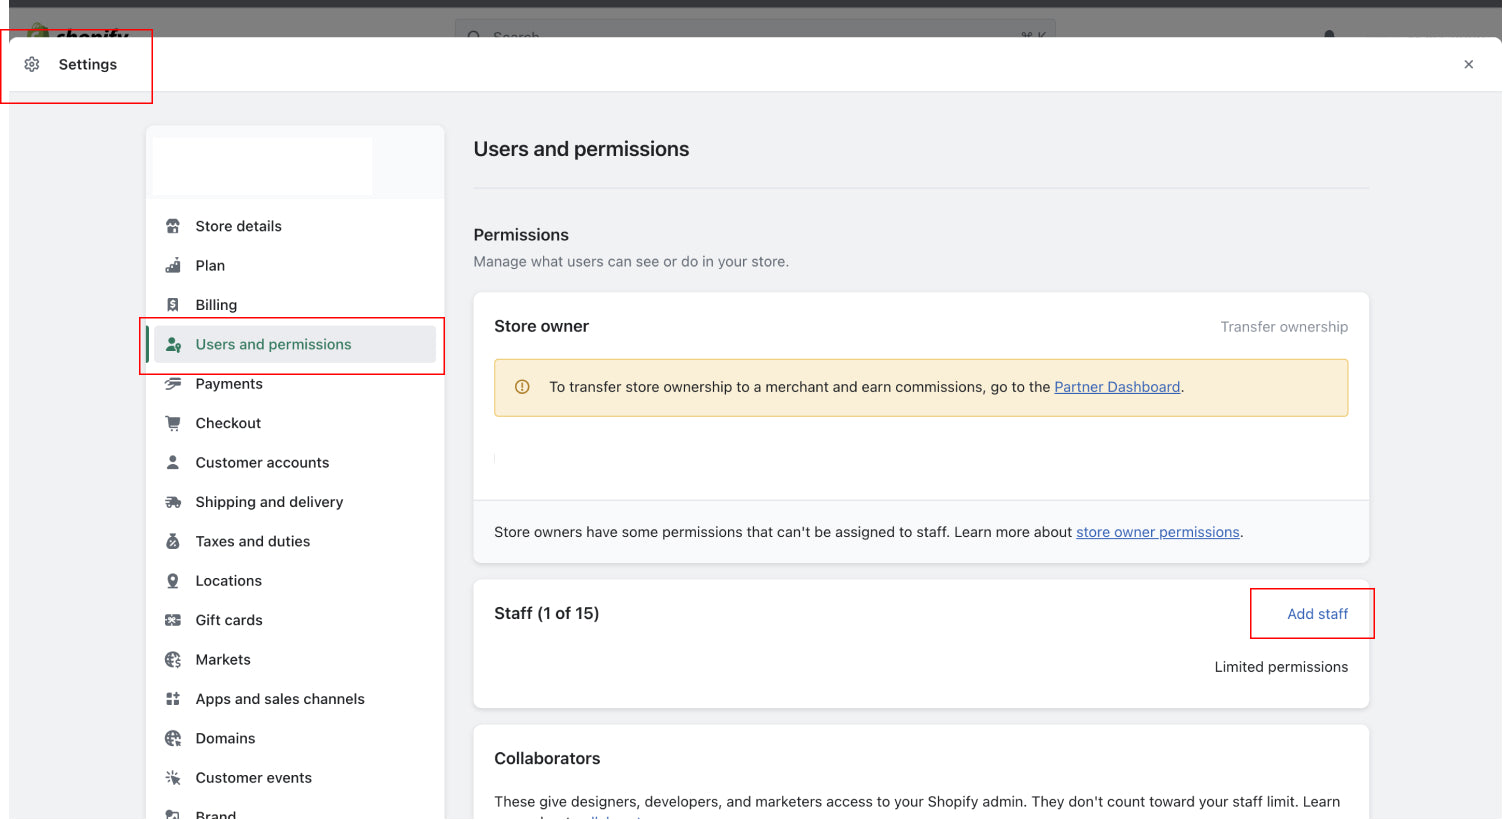
Team Permissions
To add staff members to your Shopify store, follow these simple steps:
- Access your Shopify admin panel.
- Click on "Settings," then select "Users and permissions."
- Choose "Add staff."
- Enter the staff member's full name and their email address.
- You have two options: Either select specific permissions you wish to grant the staff member (ie. can only view Orders) or proceed with default permissions.
- Finally, click "Send invite" to send the staff member an invitation to join your Shopify store.
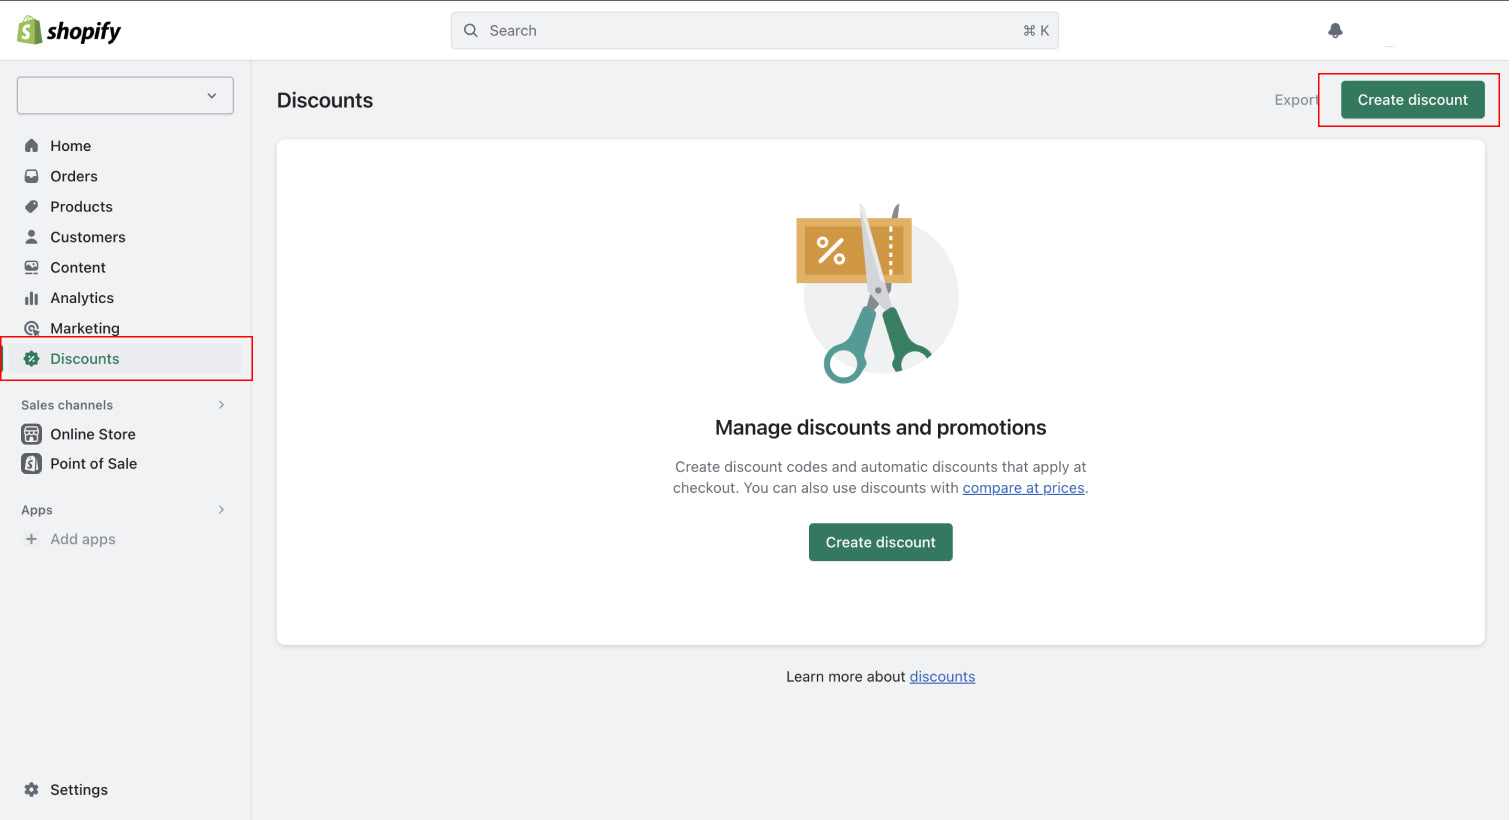
Discounts
To generate a new discount in your Shopify admin, follow these steps:
- Access your Shopify admin panel.
- Navigate to the "Discounts" section.
- On the Discounts page, locate and click the "Create discount" button.
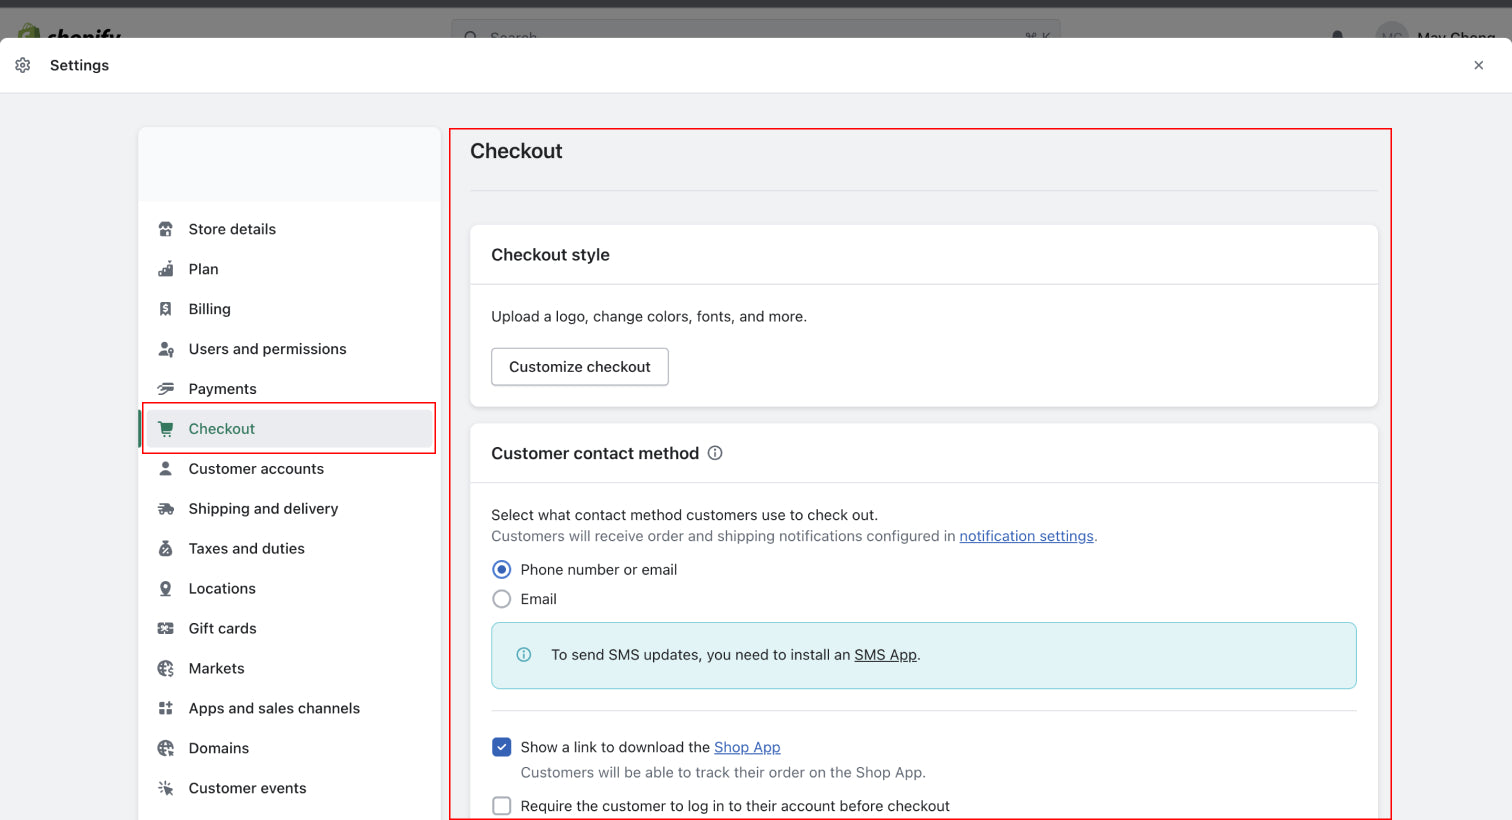
Check Out
To make changes to customer check out information settings in your Shopify store, follow these steps:
- Access your Shopify admin panel.
- Go to Store > Settings.
- In the Store settings section, tap "Checkout."
- Look for the "Customer information" section.
- Make the appropriate changes to the customer information settings.
- Click "Save".
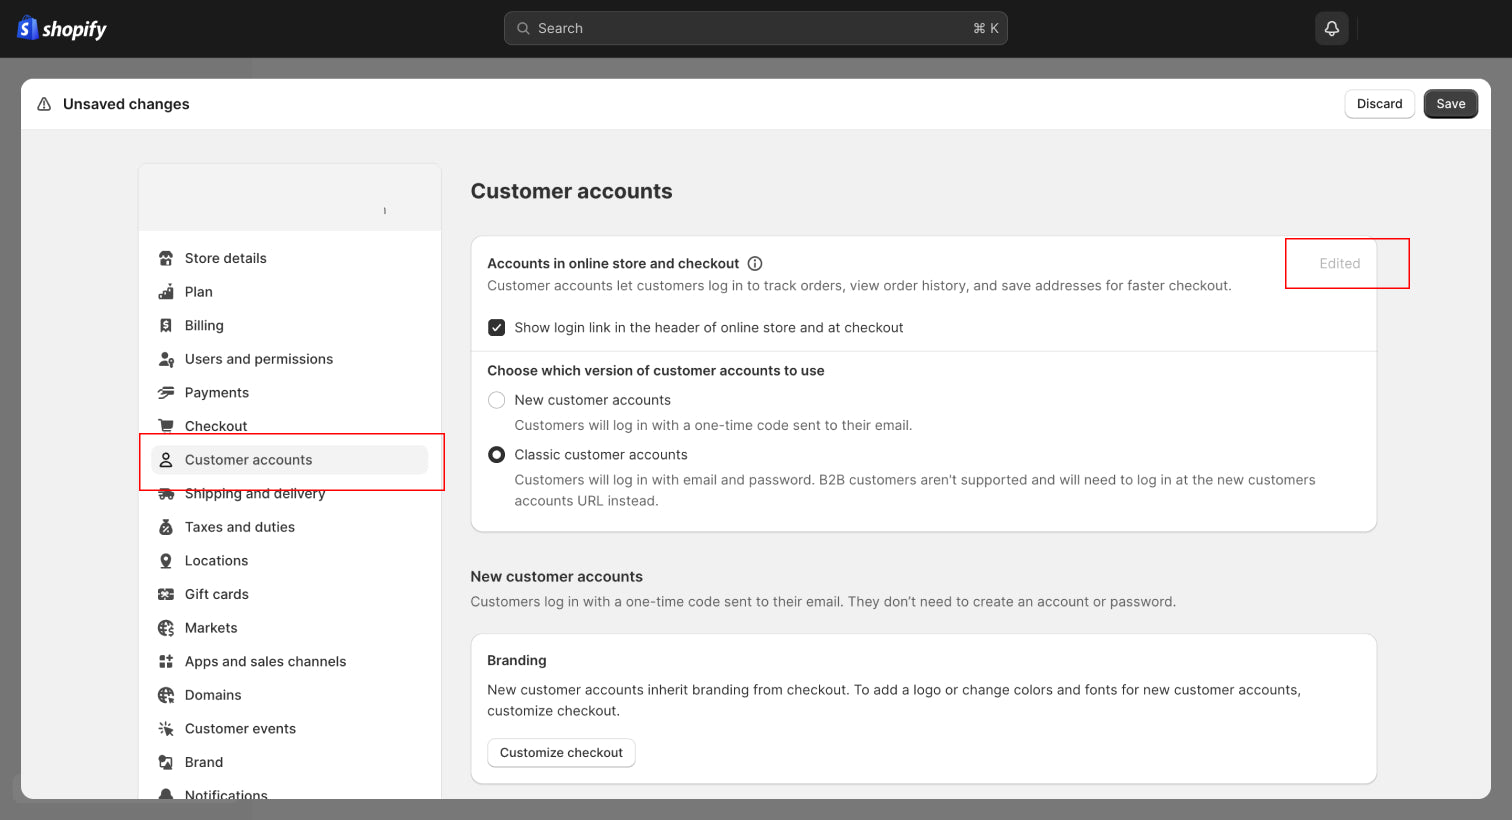
Customer Accounts
To active the customer account settings in your Shopify store, follow these steps:
- Access your Shopify admin panel.
- Go to Settings > Customer Accounts.
- Under "Accounts in online store and checkout," click "Edit."
- Tick the checkbox "Show login link in the header of online store and at checkout."
- Select the version of customer accounts you want to use.
- Click "Save."
- Preview your store, and the customer account will appear as a person icon in your navigation bar (next to your cart icon).
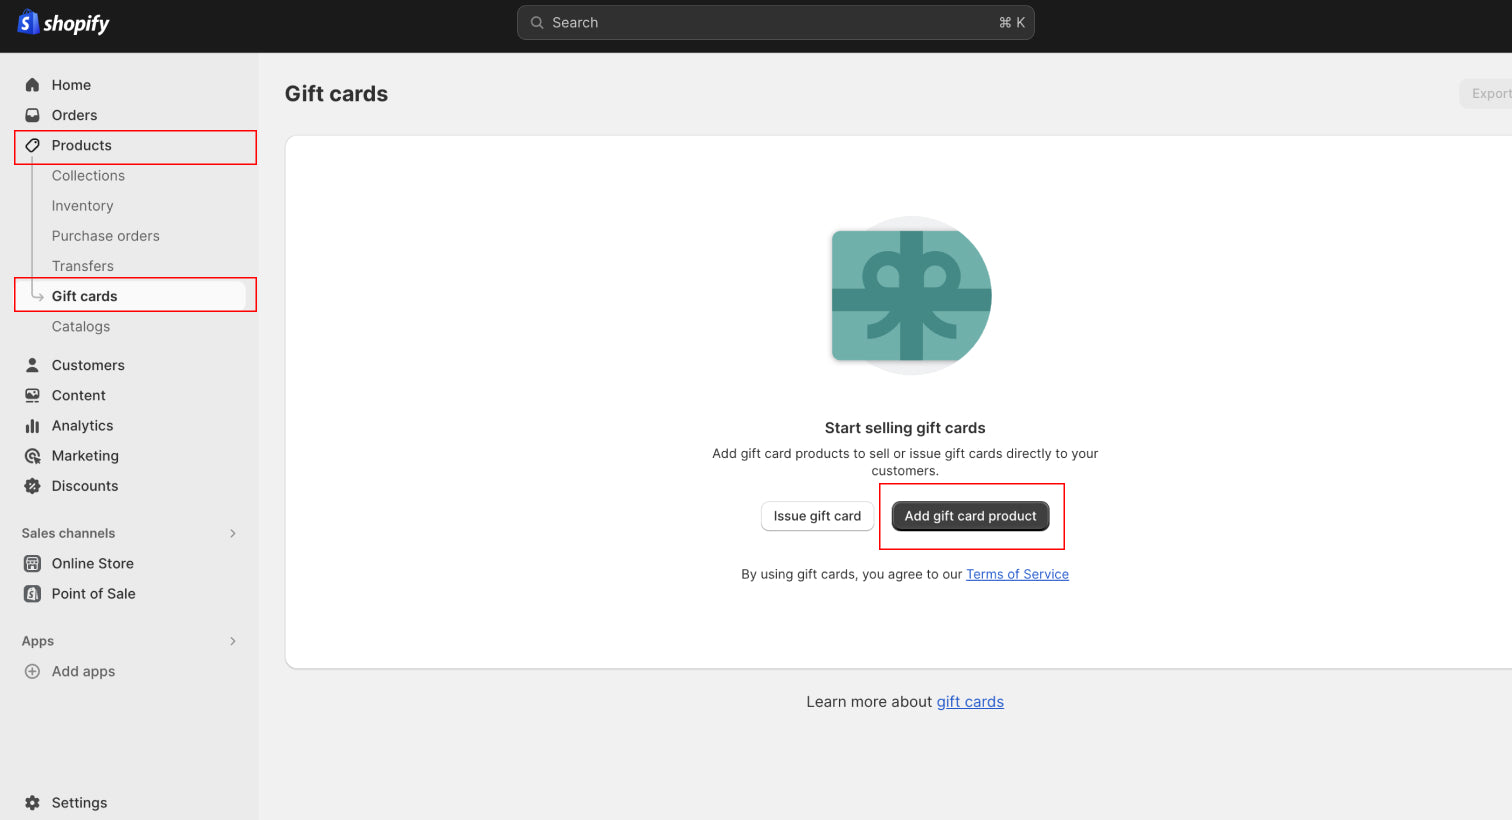
Gift Cards
To create a gift card product in your Shopify store, follow these steps:
- Access your Shopify admin panel.
- Go to Products > Gift Cards.
- Click "Add Gift Card Product," fill in the settings, and then click "Save."
To adjust further gift card settings or update them, follow these steps:
- Access your Shopify admin panel.
- Navigate to Settings > Gift Cards.
- Click "Edit" and choose your desired custom gift card settings.
- Click "Save."
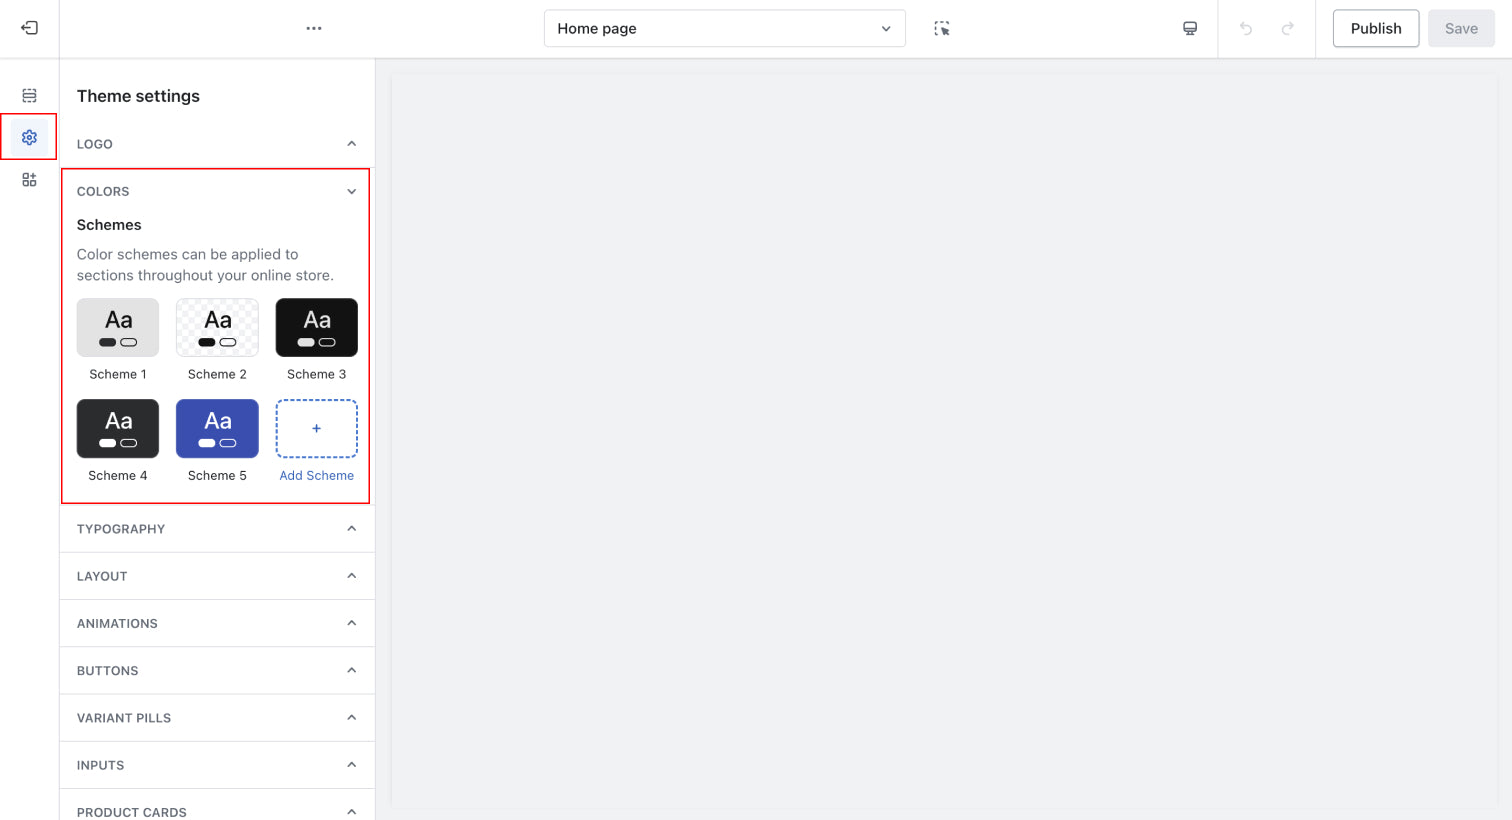
Theme Settings
Colour
Customise the site's colours here. You have the option to create several collection of colour palettes:
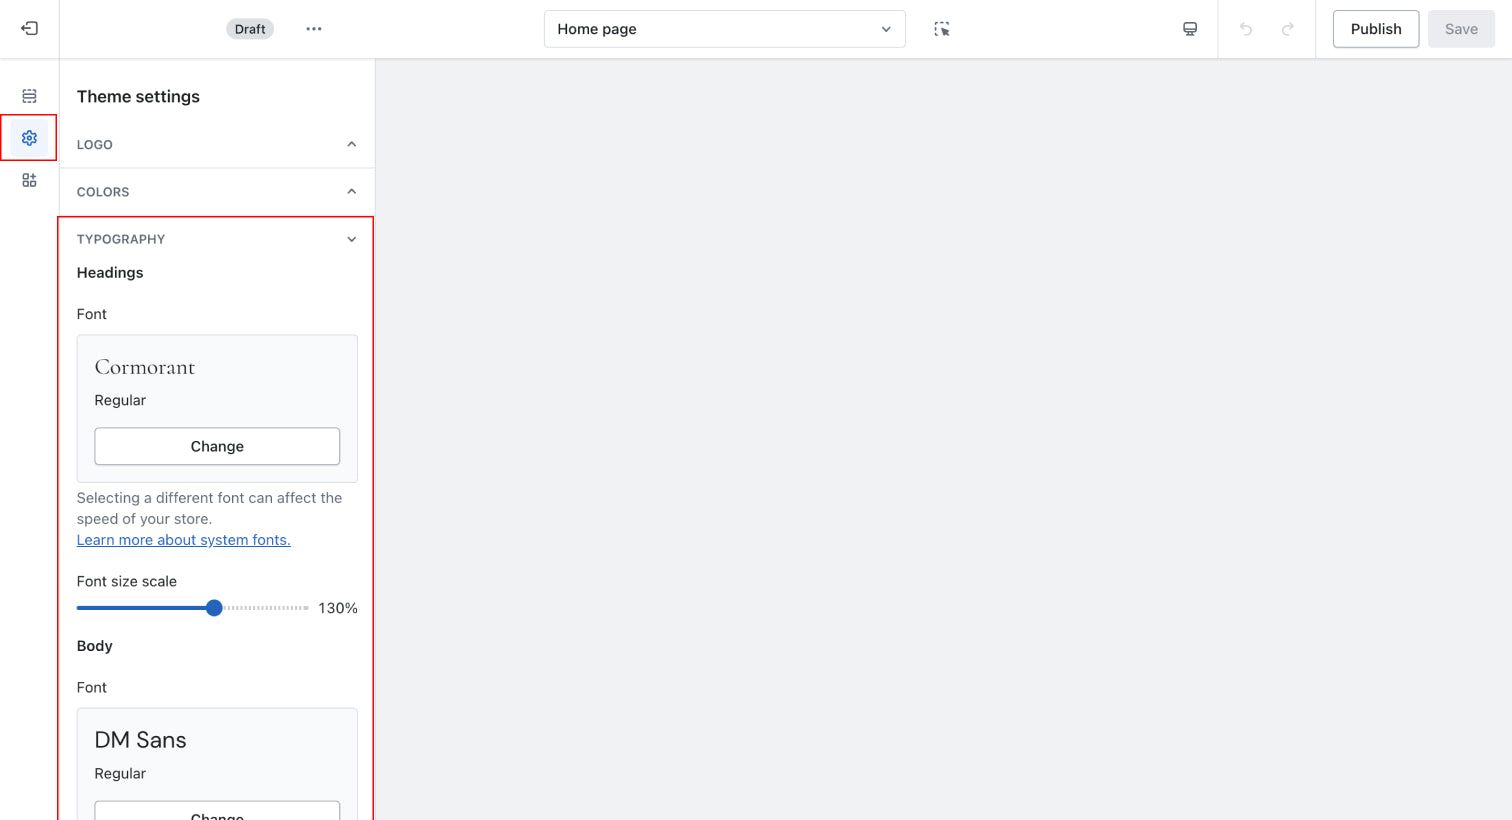
Typography
Customize the site's typography here.
It shows current font family, font size, font weight for the following H1, H2, H3, H4, H5, H6 and font family.
Can I upload my own custom fonts?
You can use the app Fontify to install your own custom fonts.
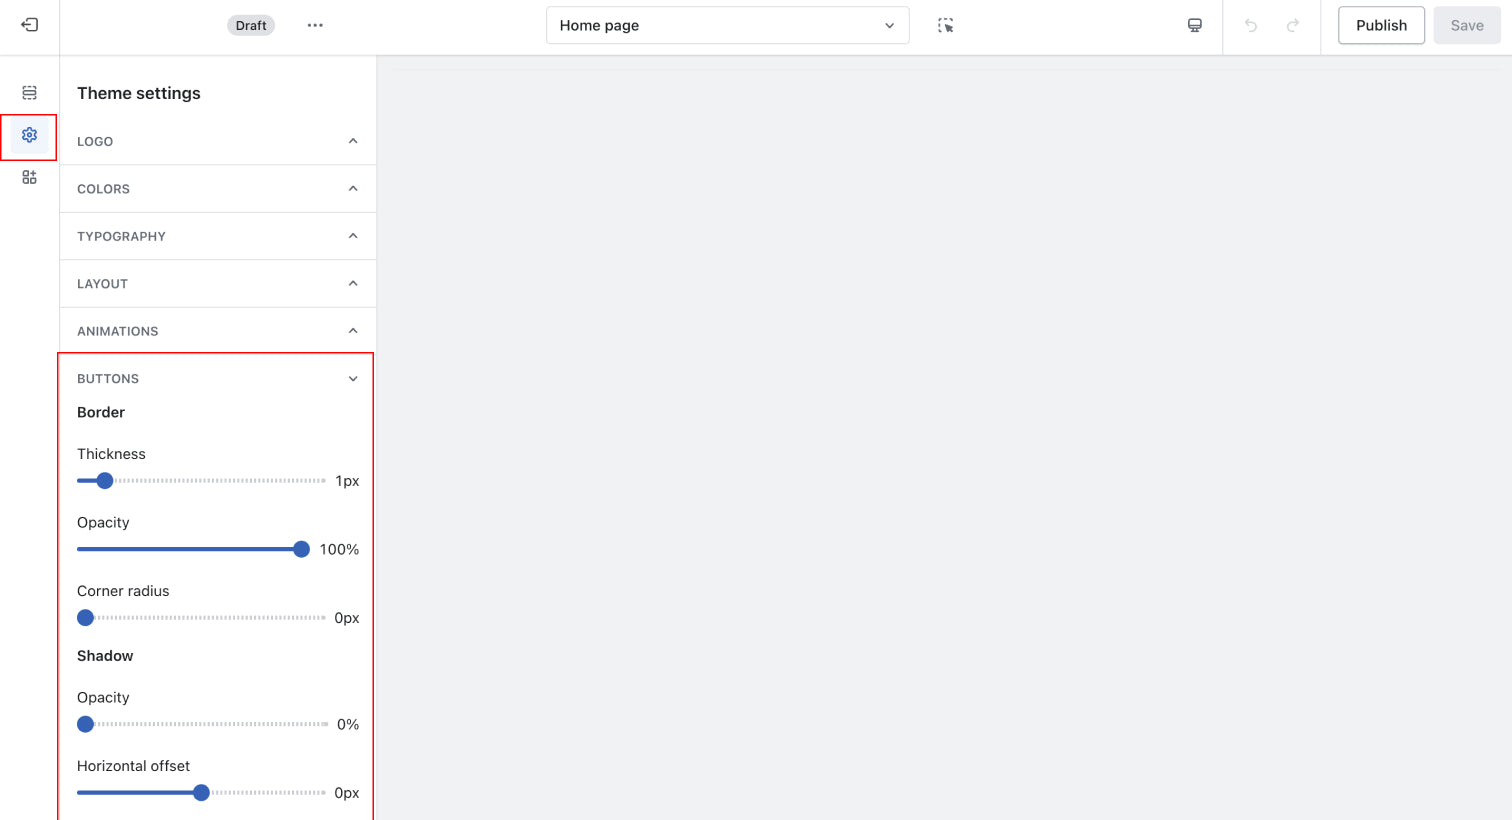
Buttons
Customise the appearance of your site's buttons here.
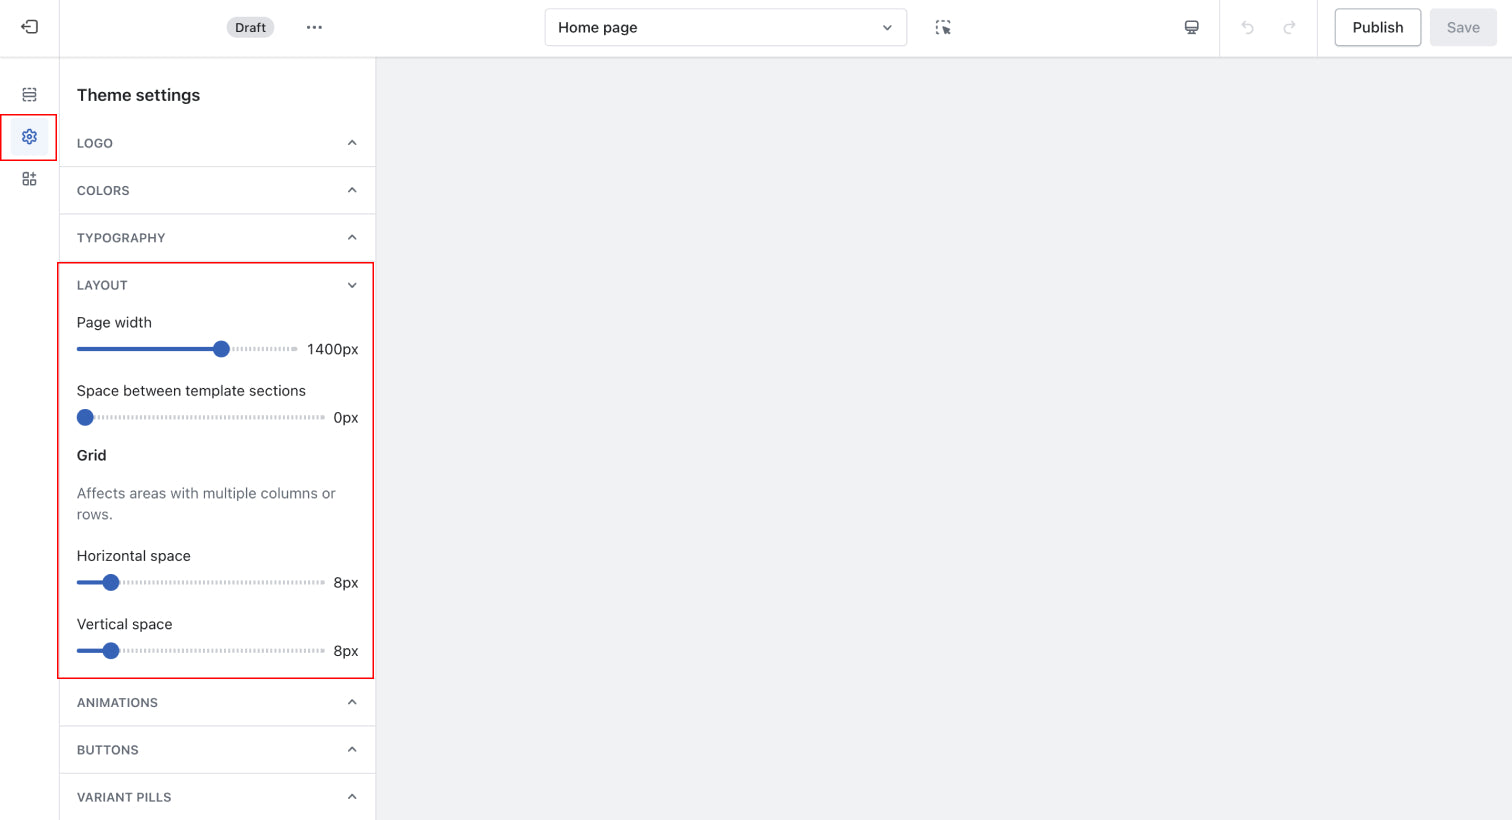
Page Layout
Customise the site's page layout here.
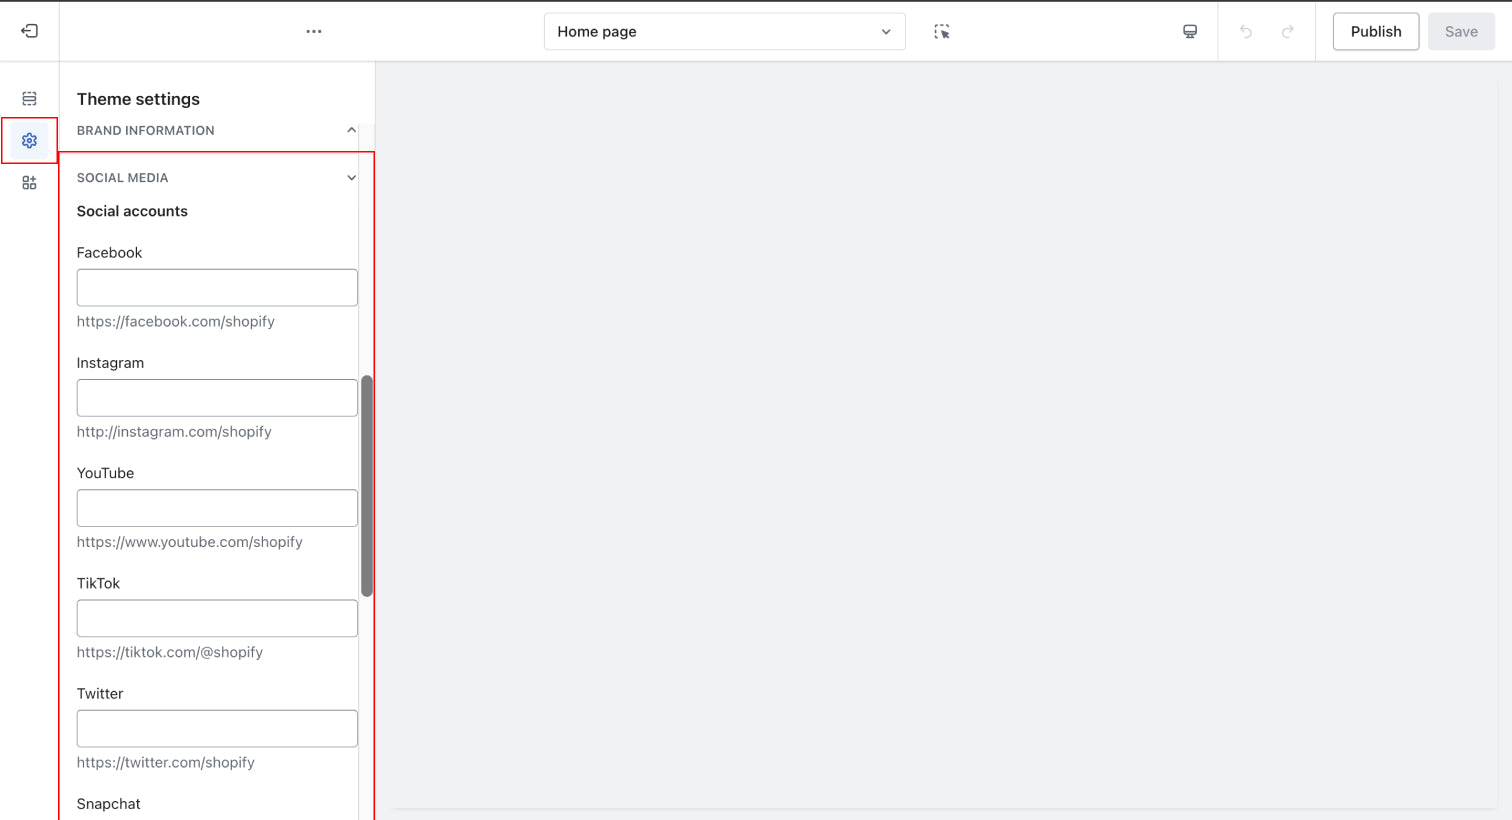
Social Media
Link your social media links here.
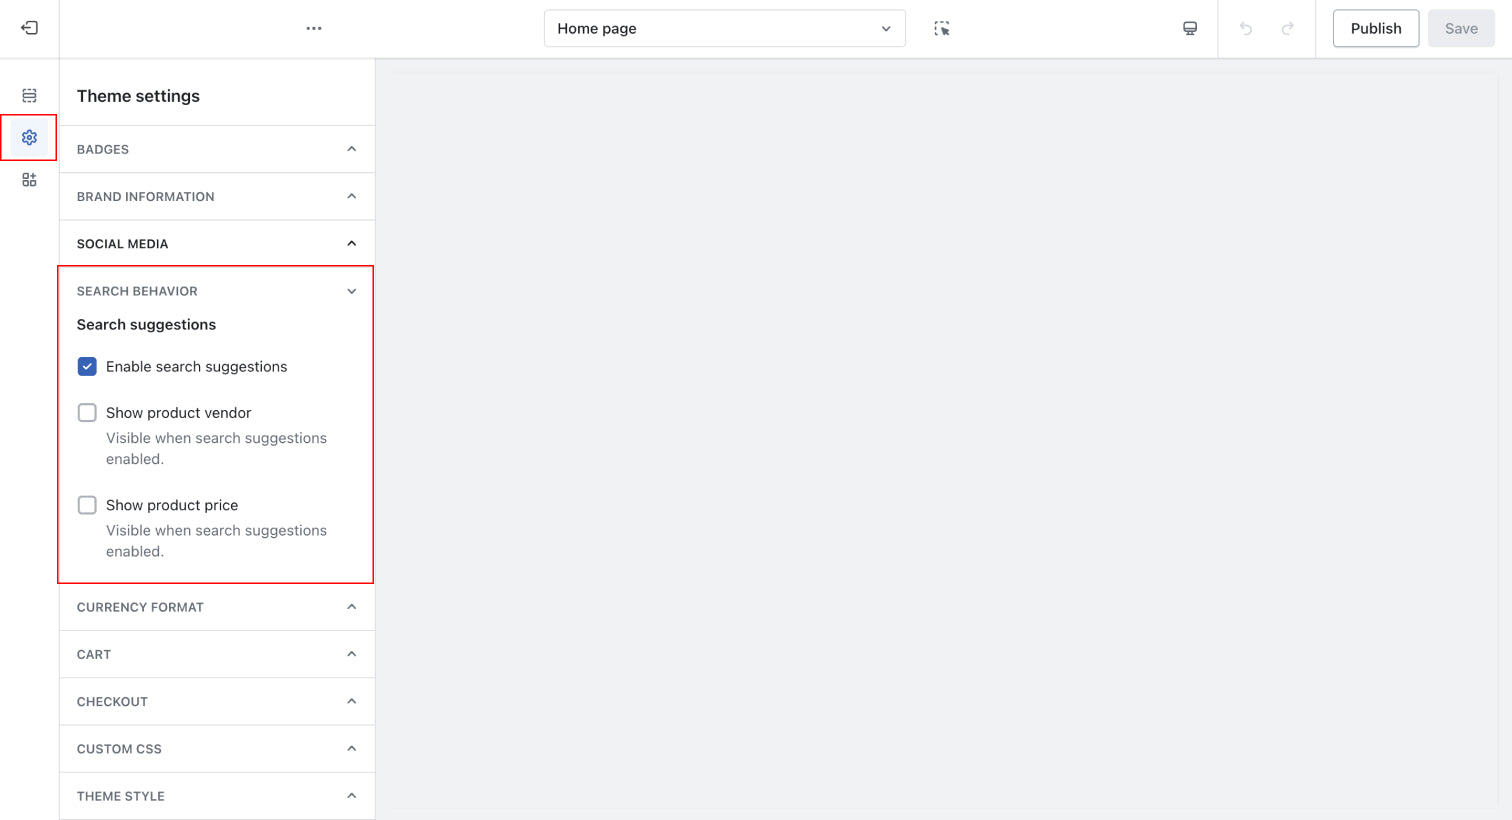
Search
Customise the site's search behaviour here.
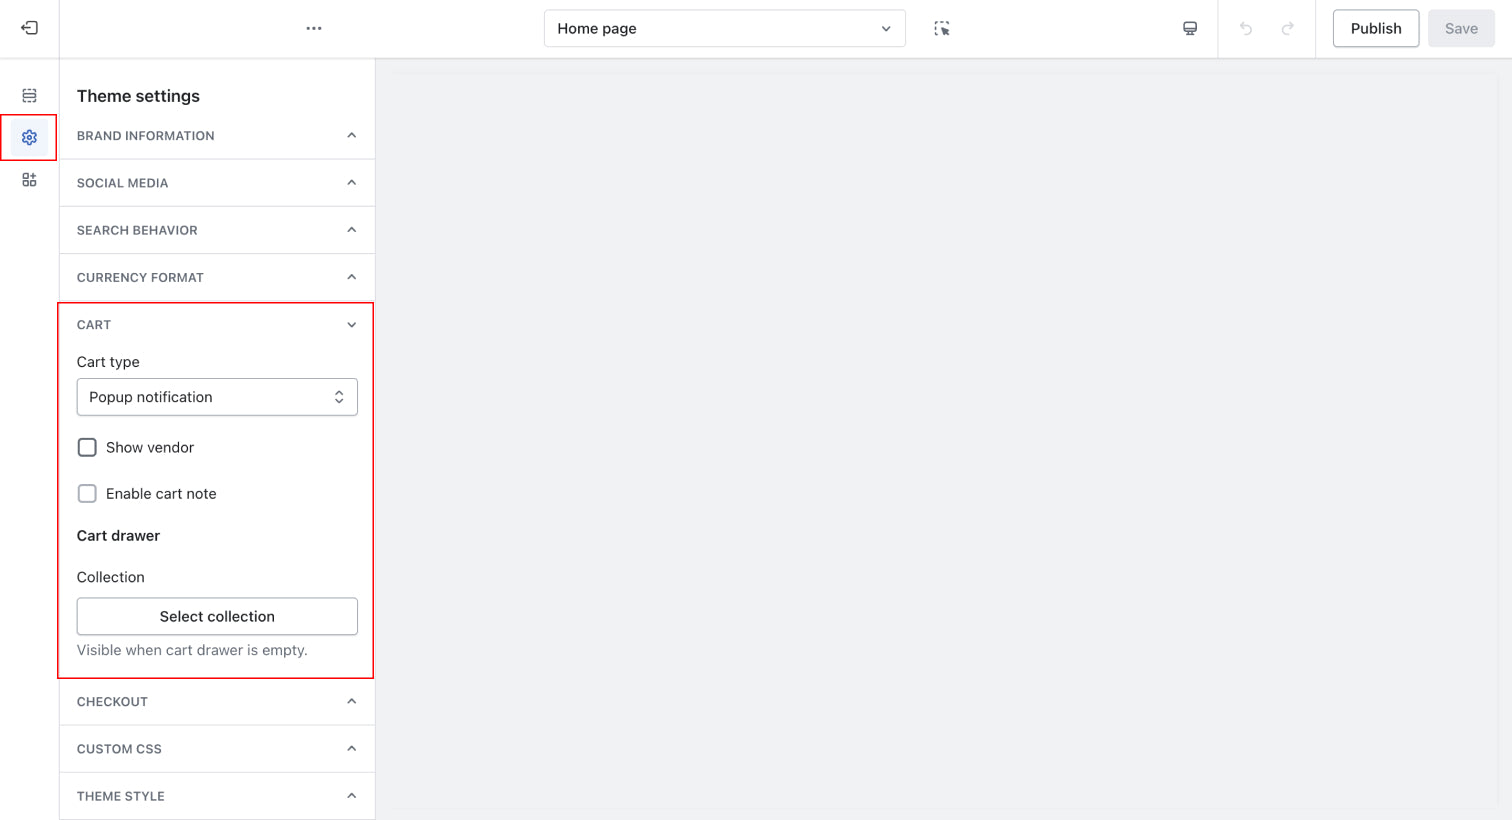
Cart
Customise the site's cart settings here.
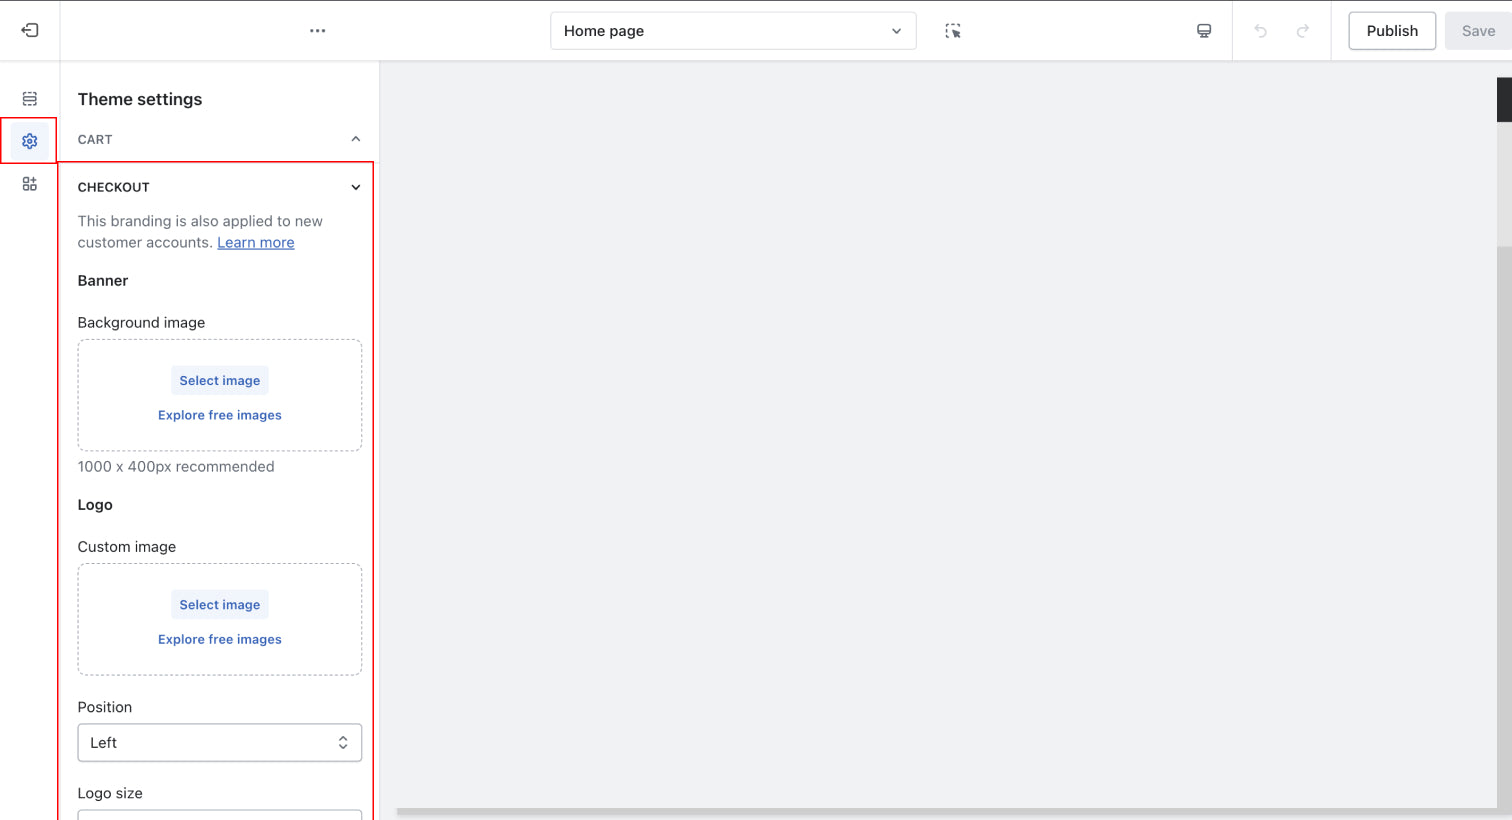
Check Out
Customise the site's Check Out settings here.
Customising your store
Announcement Bar
Customise the site's Announcement Bar here.
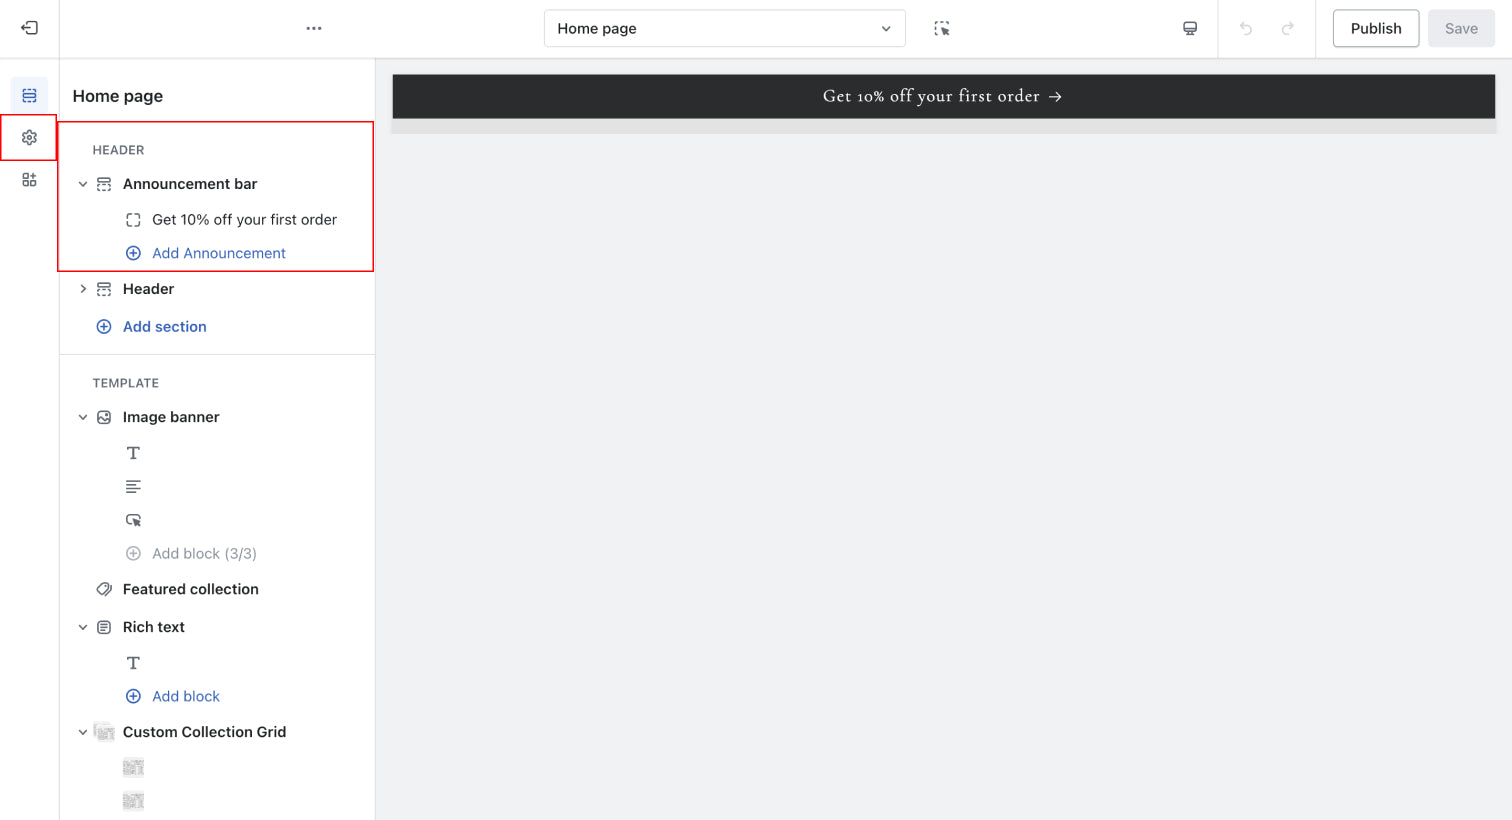
Header
This includes the navigation bar, search and cart icons. You can turn on or off these sections in the left panel.
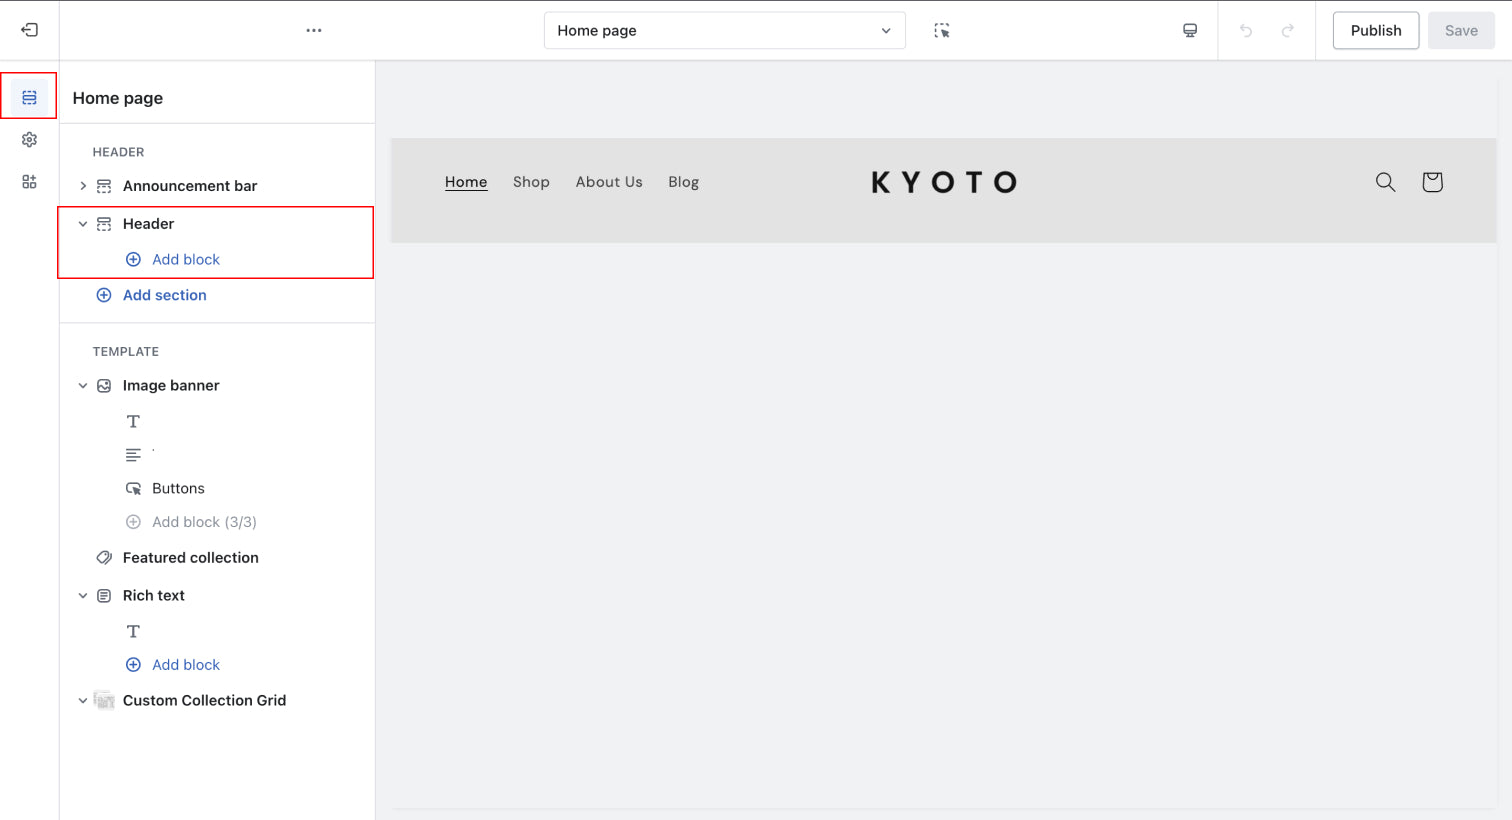
Navigation Bar
Customising the appearance
You can customise it here:
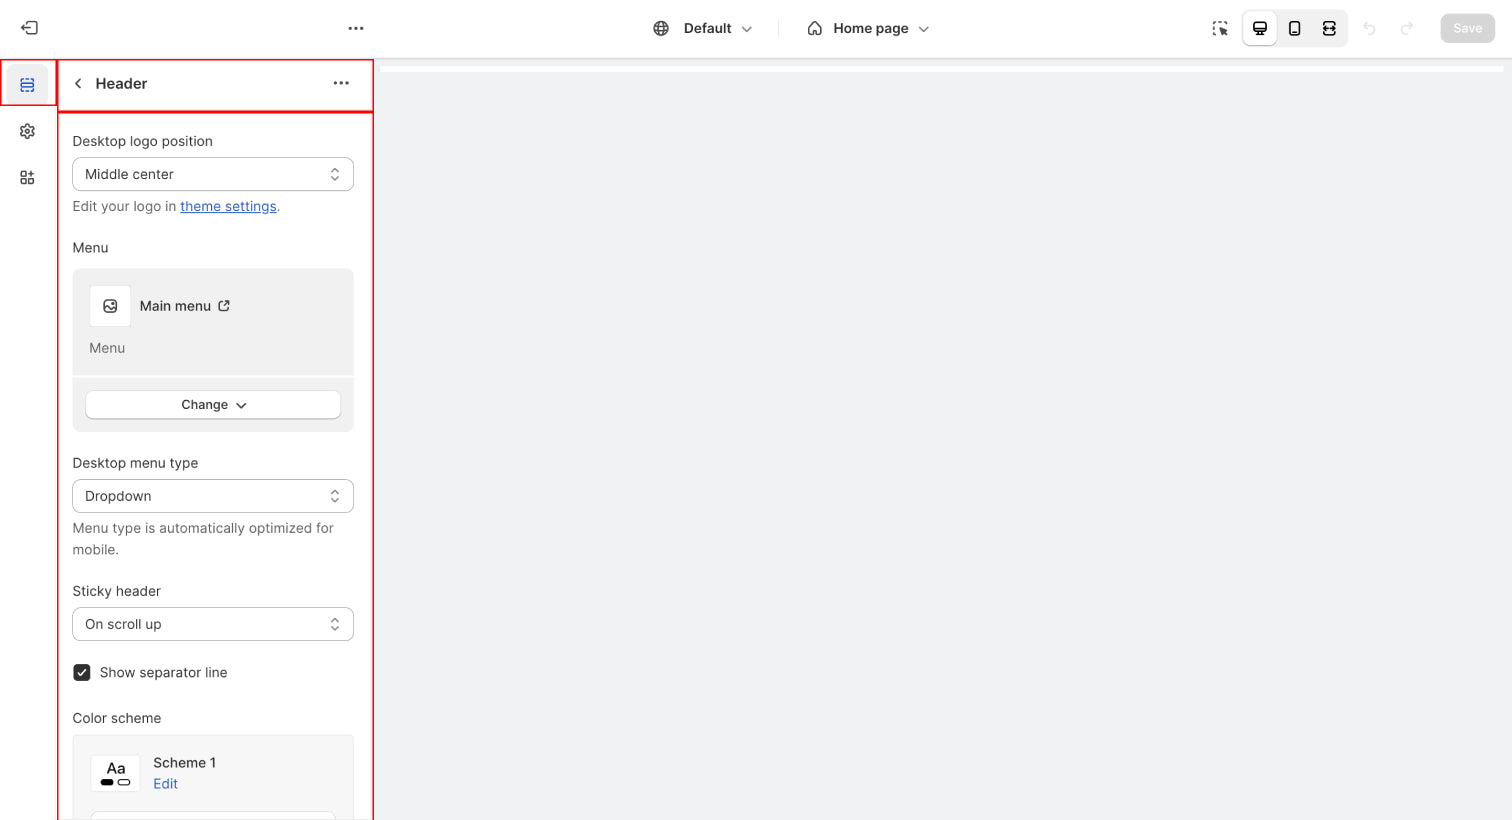
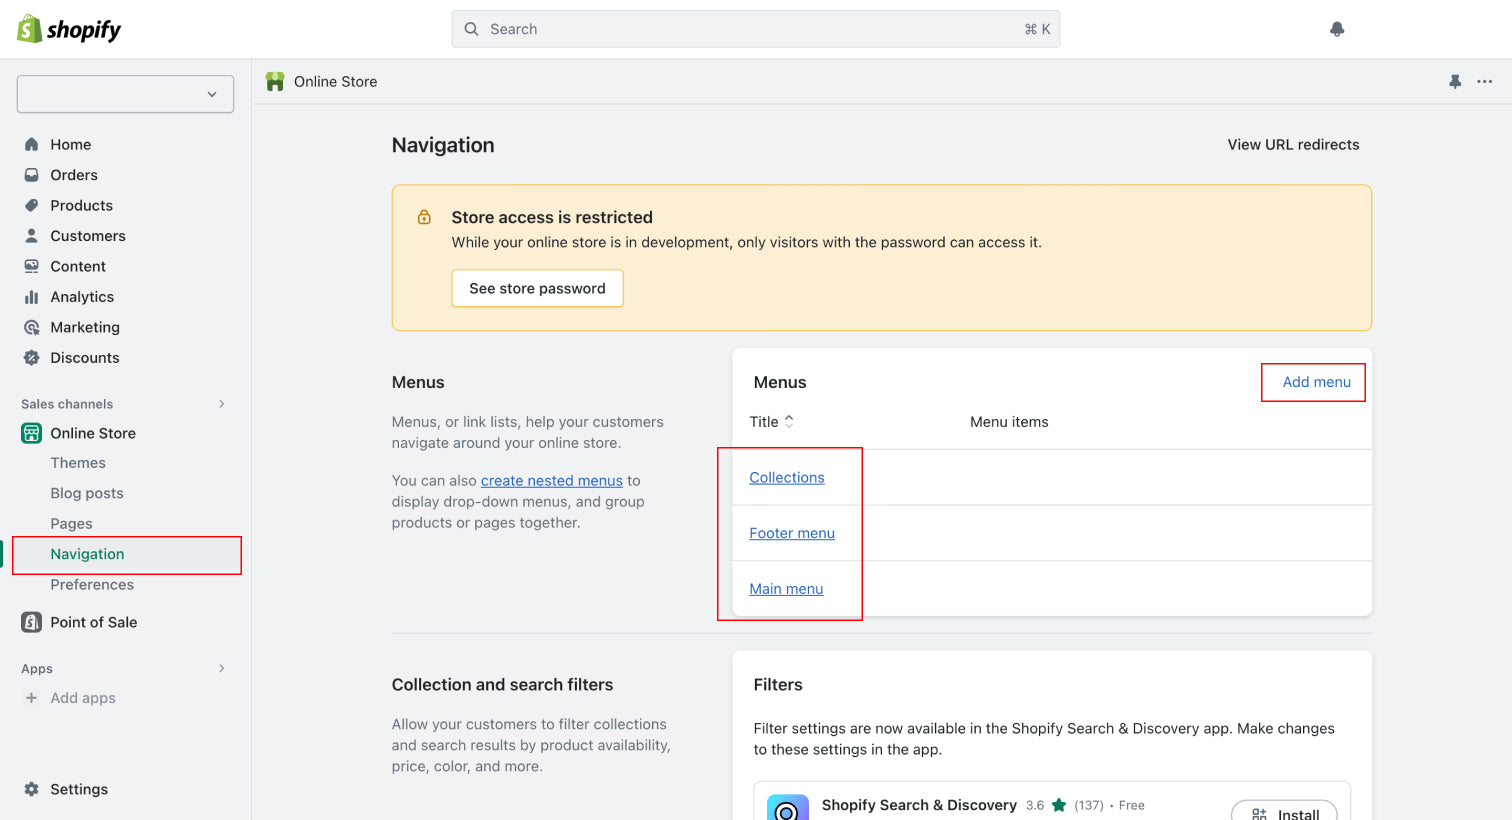
Navigation Menu Items
Adding Menu Items:
To add menu items to your navigation in Shopify, follow these steps:
- Access your Shopify admin.
- Click on "Online Store" in the left-hand sidebar.
- Select "Navigation."
- Choose the menu you want to modify (e.g., "Main Menu").
- Click on the "Add menu item" button.
- Select the type of link you want to add: products, collections, webpages, blog posts, policies, or other websites.
- Fill in the required details for the link, including the title and the destination URL.
- Click "Save".
Logo
Upload your logo and favicon here. You have the option to customize the logo size.
The favicon appears next to the page title in your browser tabs.
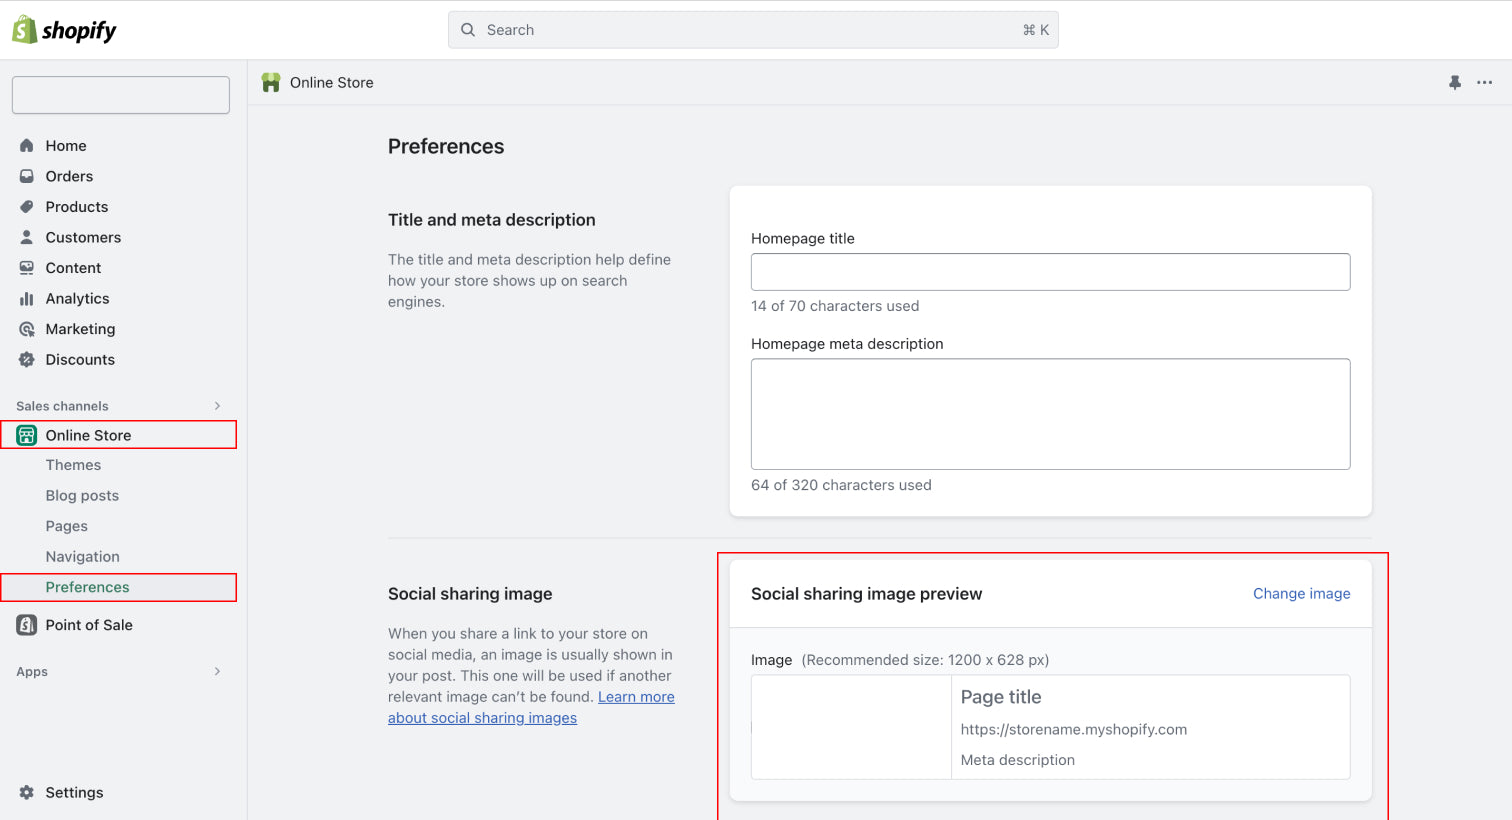
Social Sharing Image
To set or change the social sharing image for your Shopify store, follow these steps:
- Access your Shopify Admin panel.
- Click on "Online Store."
- Click "Preferences."
- Look for the "Social sharing image" section.
- To upload a new image, click "Add image." To change the existing image, click "Edit" and then "Change image."
- Select the image from your computer that you want to use as the social media sharing image.
- Click "Save."
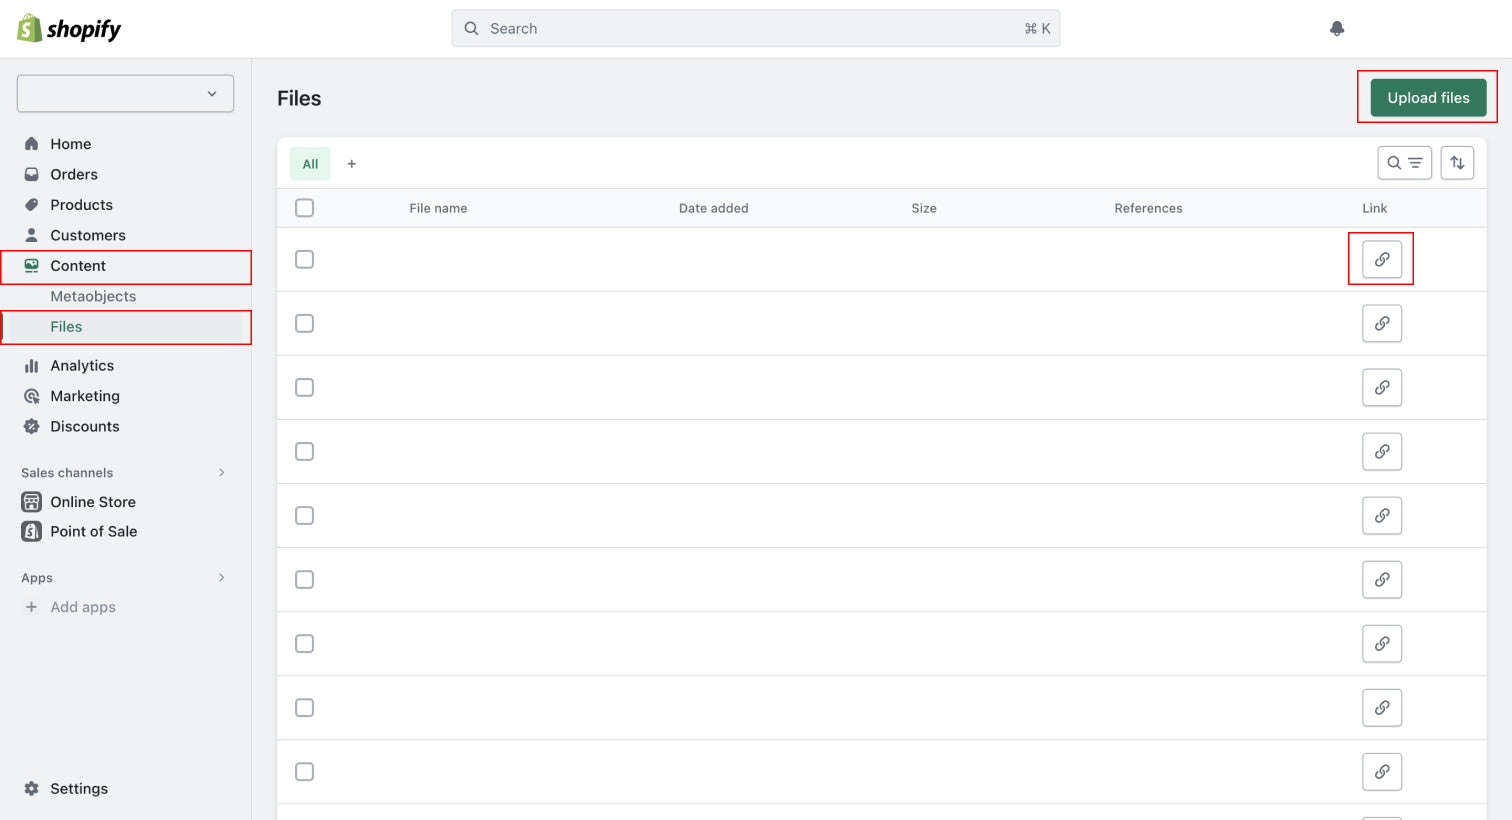
Video
Upload a video
To upload a video to your Shopify store, follow these steps:
- Access your Shopify admin.
- Go to Content > Files.
- Click "Upload files."
- Select the video you want to upload, and then click "Open."
Adding a video to your theme
To add a video to your Shopify theme, follow these steps:
- Follow the steps above to upload your video to Shopify so that it is available in your Files admin.
- In your Files admin, click the link icon next to the uploaded video. This will copy the URL of the hosted video file.
- In your Shopify admin sidebar, navigate to Online Store > Themes, and then click "Customize" to enter the theme editor.
- Within the theme editor, locate the section where you want to add the video.
- Paste the copied URL from step 2 into the designated field labeled "Video Link" in the section settings.
- Save your changes to apply the video to your Shopify theme.
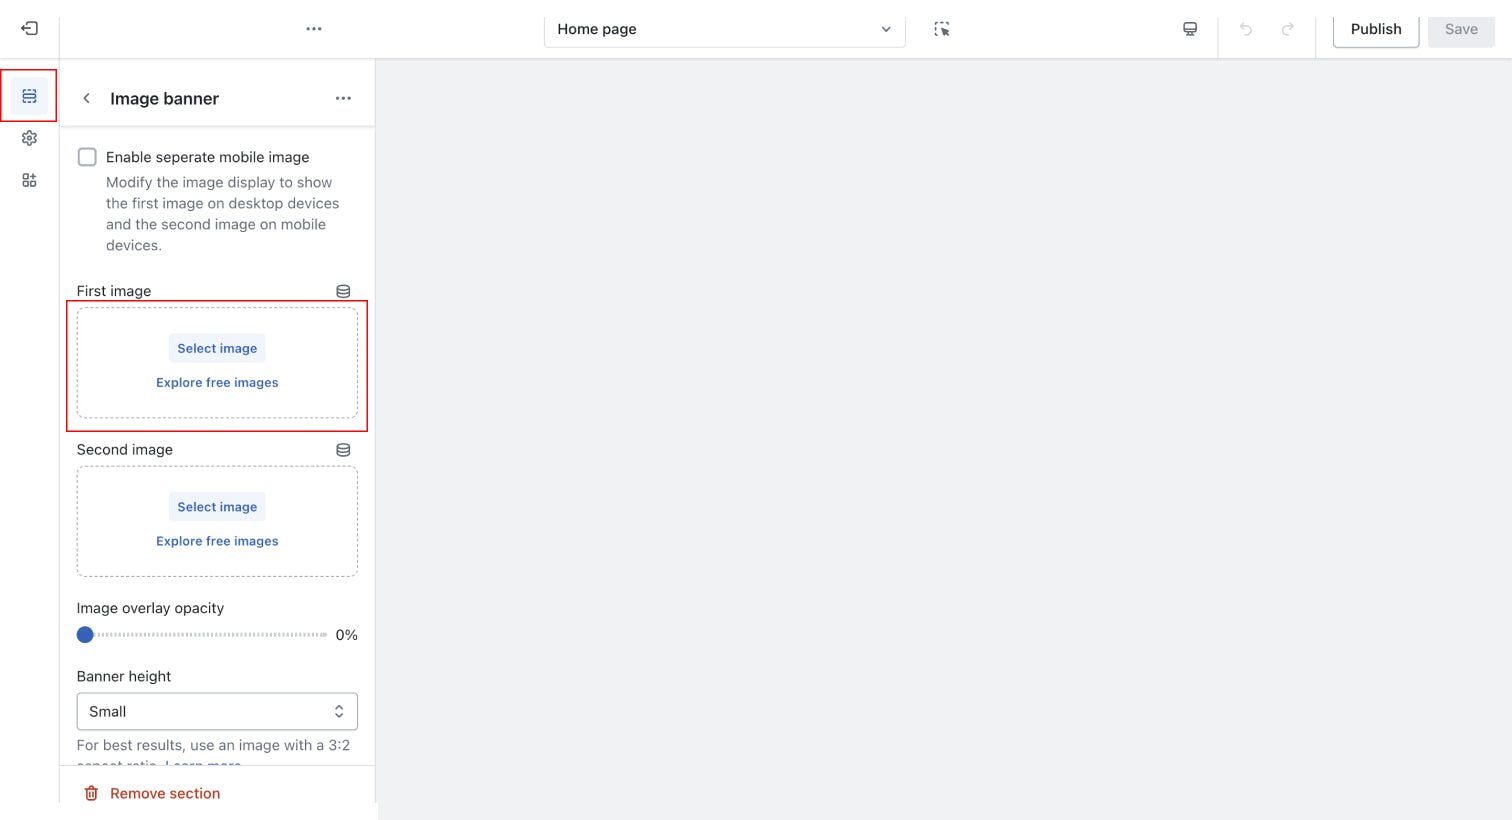
Images
Upload an Image into your theme
To upload images into your Shopify theme, follow these steps:
- Access your Shopify admin.
- Go to Online Store > Themes.
- Click "Customize" to enter the theme editor.
- Find the section where you want to add the image.
- Look for an option to "Upload image" or "Add image" within that section.
- Click on the "Upload image" or "Add image" button.
- Choose the image you want to upload from your computer and click "Open" to upload it.
- Once the image is uploaded, save your changes to apply the image to your Shopify theme.
Metafields (dynamic content)
Metafields help you to customize the functionality and appearance of your Shopify store by letting you save specialized information that isn't usually captured in the Shopify admin.
Watch this video to learn how to set it up.
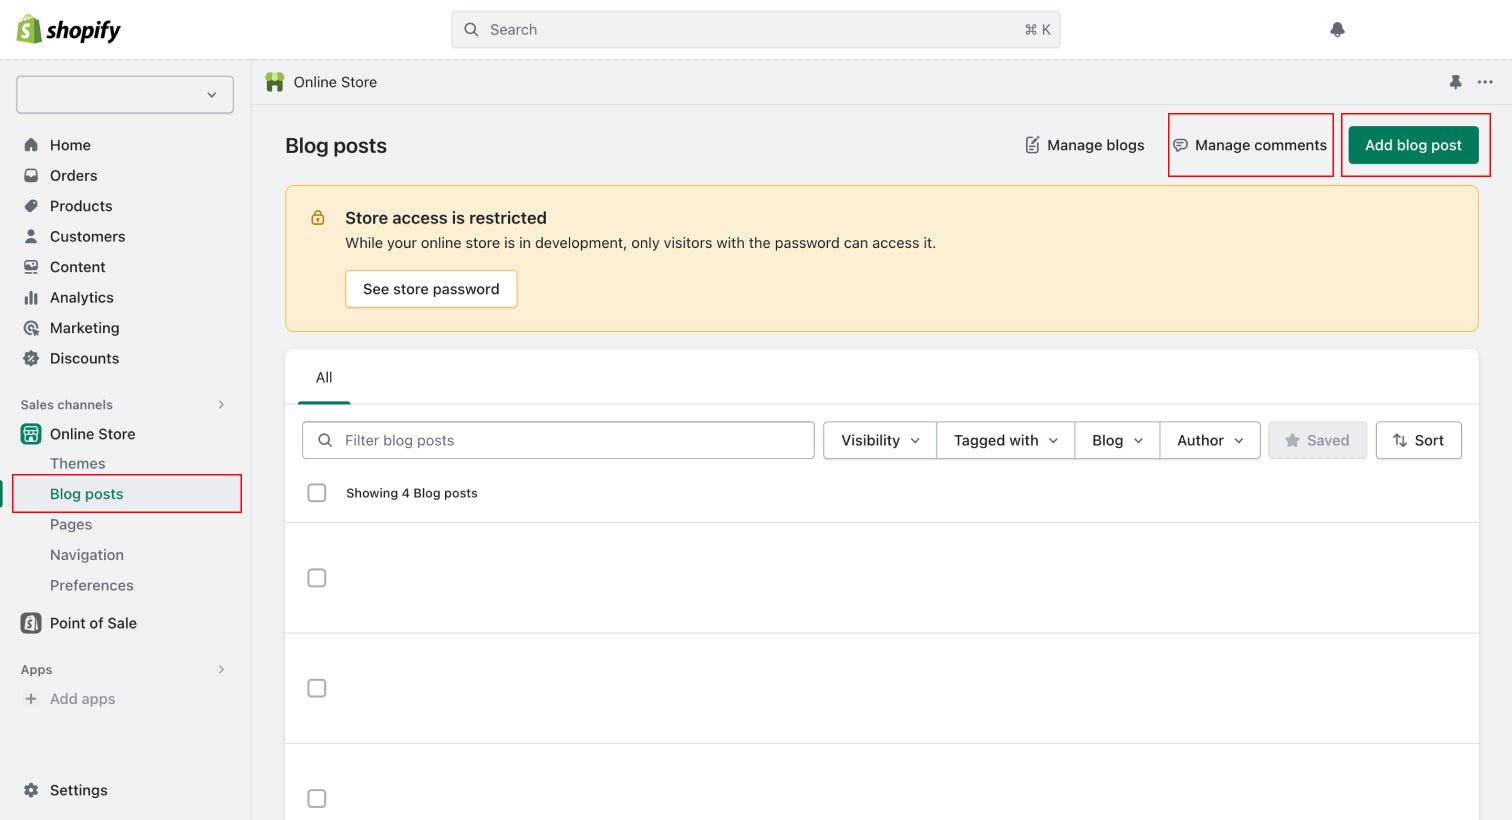
Blog
How to create a blog
To create a blog post in Shopify, follow these steps:
- Access your Shopify admin.
- Go to Online Store > Blog Posts.
- Click "Add Blog Post."
- Provide your blog post with a title and add the content you wish to include in the post.
- Click "Save".
How to manage blog comments
To manage blog comments in Shopify, follow these steps:
- Access your Shopify admin.
- Go to Online Store > Blog Posts.
- Click "Manage blogs" next to the specific blog post you want to manage comments for. (Alternatively, you can click on "Blog Title" to access the blog post and then proceed to manage comments.)
- Select the option that corresponds to how you want to manage comments, such as allowing comments, disabling comments, or requiring approval for comments.
- Click "Save".
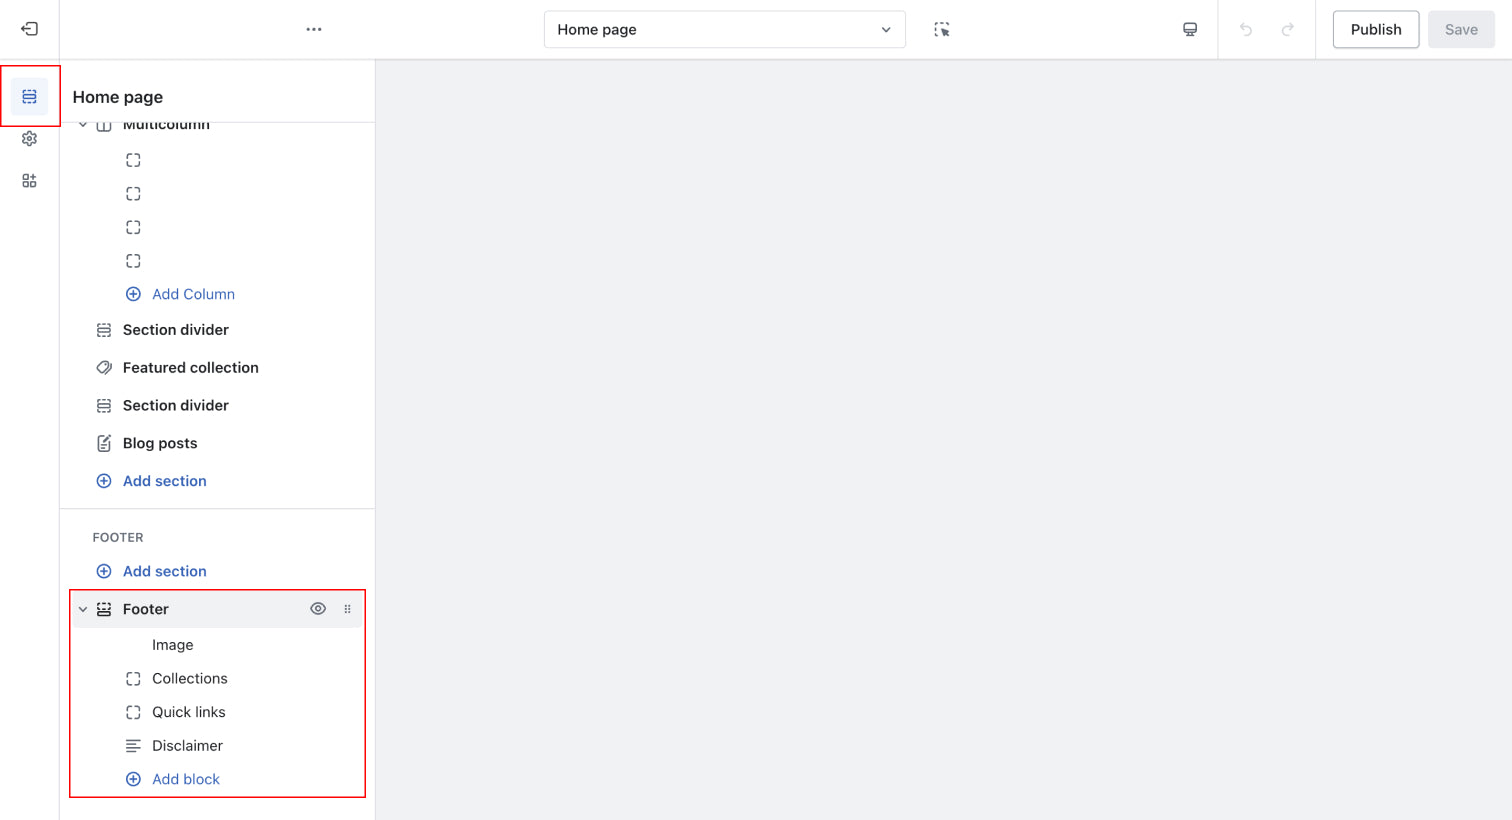
Footer
Customise the site's footer here. Simply choose the block type to select the contents you want to display.
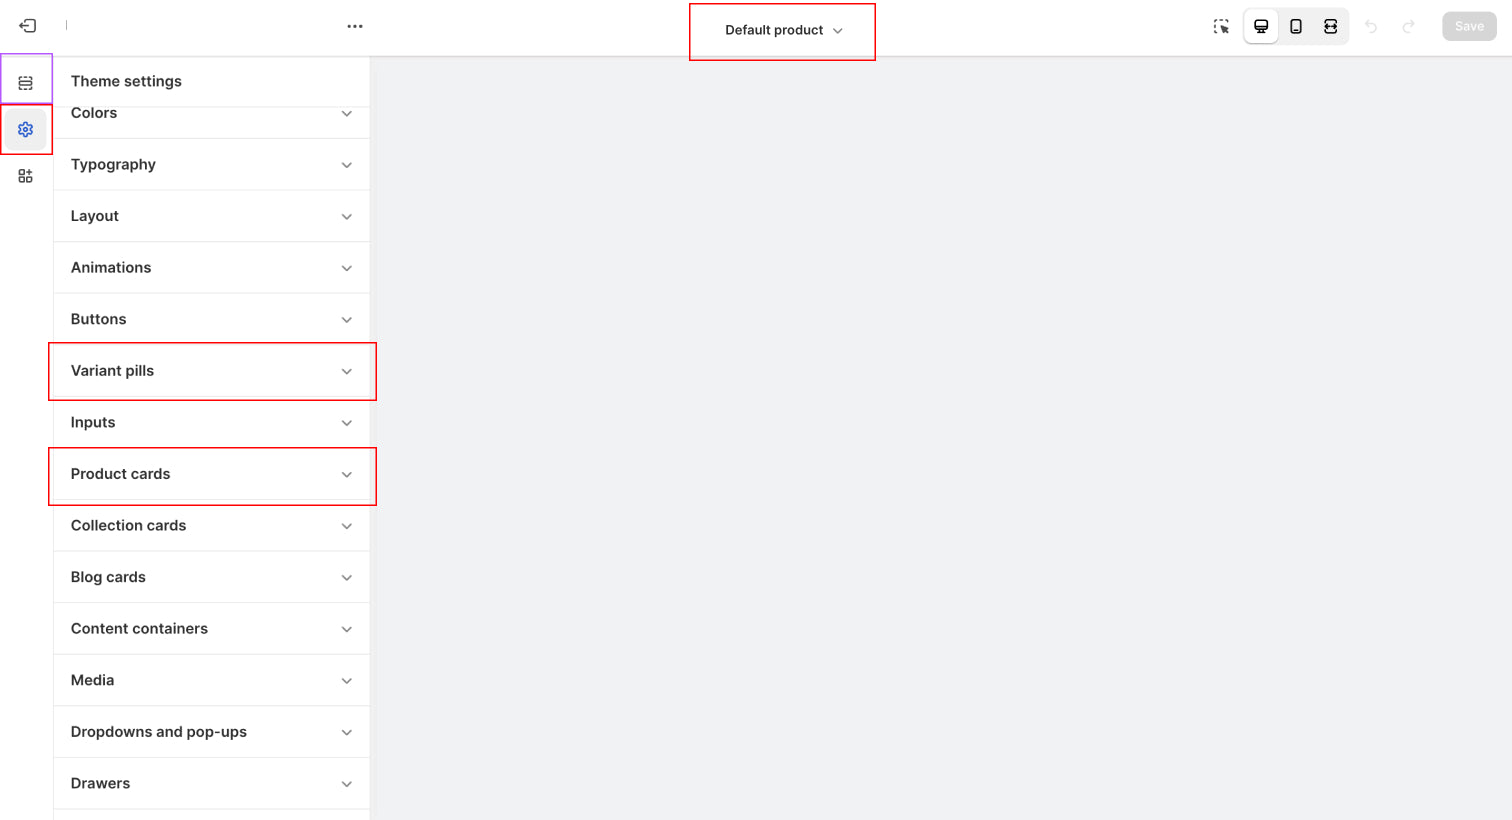
Products
Customise the appearance of the product page:
- Access your Shopify admin panel.
- Navigate to Online Store > Themes.
- Click "Customise" next to the theme to enter the theme editor.
- Open the drop-down menu situated at the top of the page, then click on "Default Product".
- Customise your products page by using the Sections and Theme Settings (Variant Pills & Product Cards) tabs.
- Click "Save."
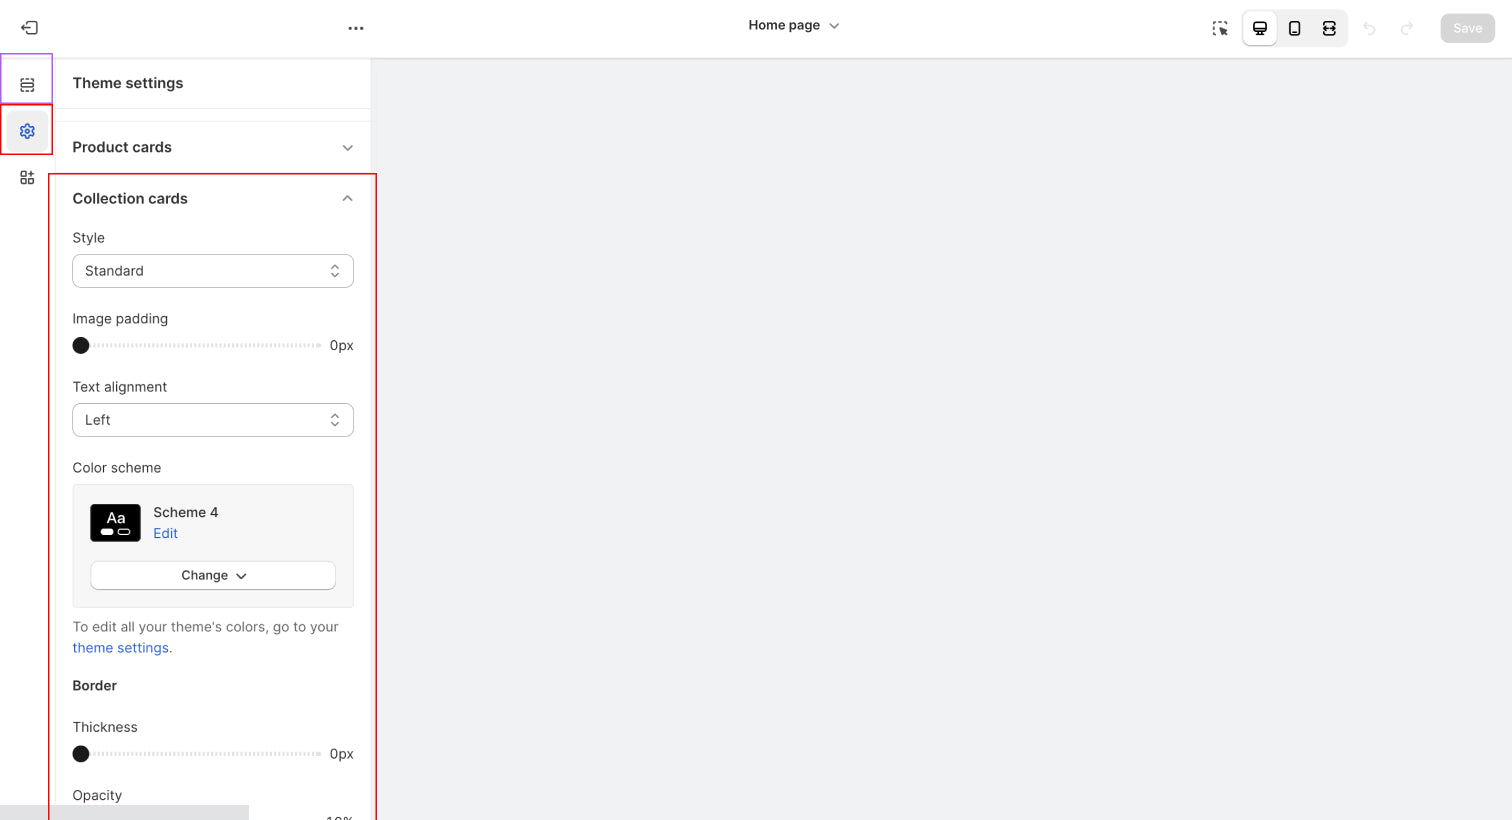
Collections
Customise the appearance of the collection cards here:
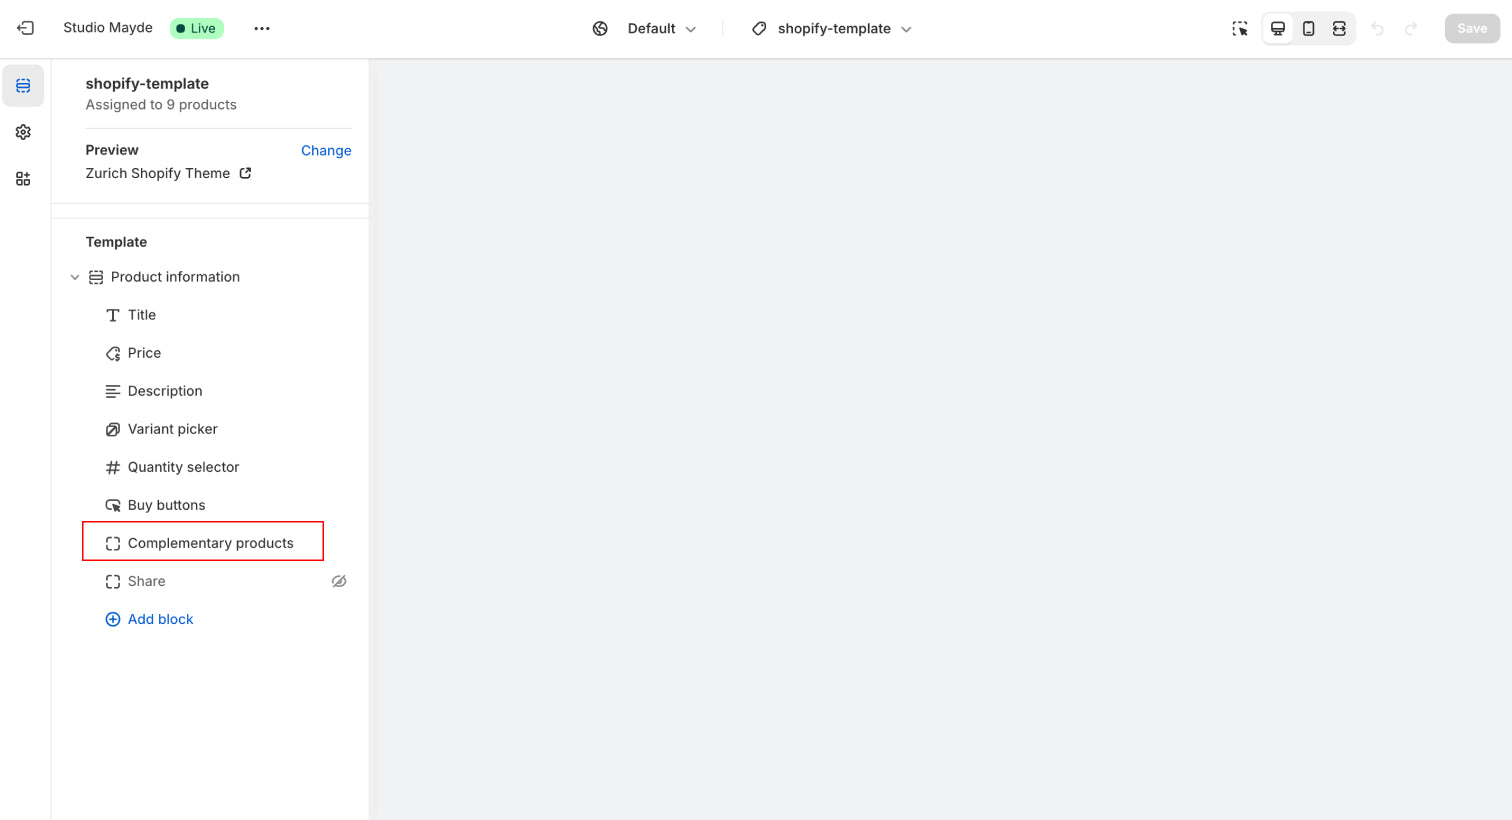
Add complementary products to product detail pages
Install the Search & Discovery App: Download the app from the Shopify App Store. Once installed, it allows you to manage product recommendations, including complementary items for each product.
Within the app you can select specific products that pair well with the main item. For example, if a customer is viewing a skincare product, you could suggest related items like a cleanser, serum, or moisturiser.
To integrate it with your theme, go to your product detail page in the Shopify editor and customize the settings under 'Complementary Products' in the sidebar.
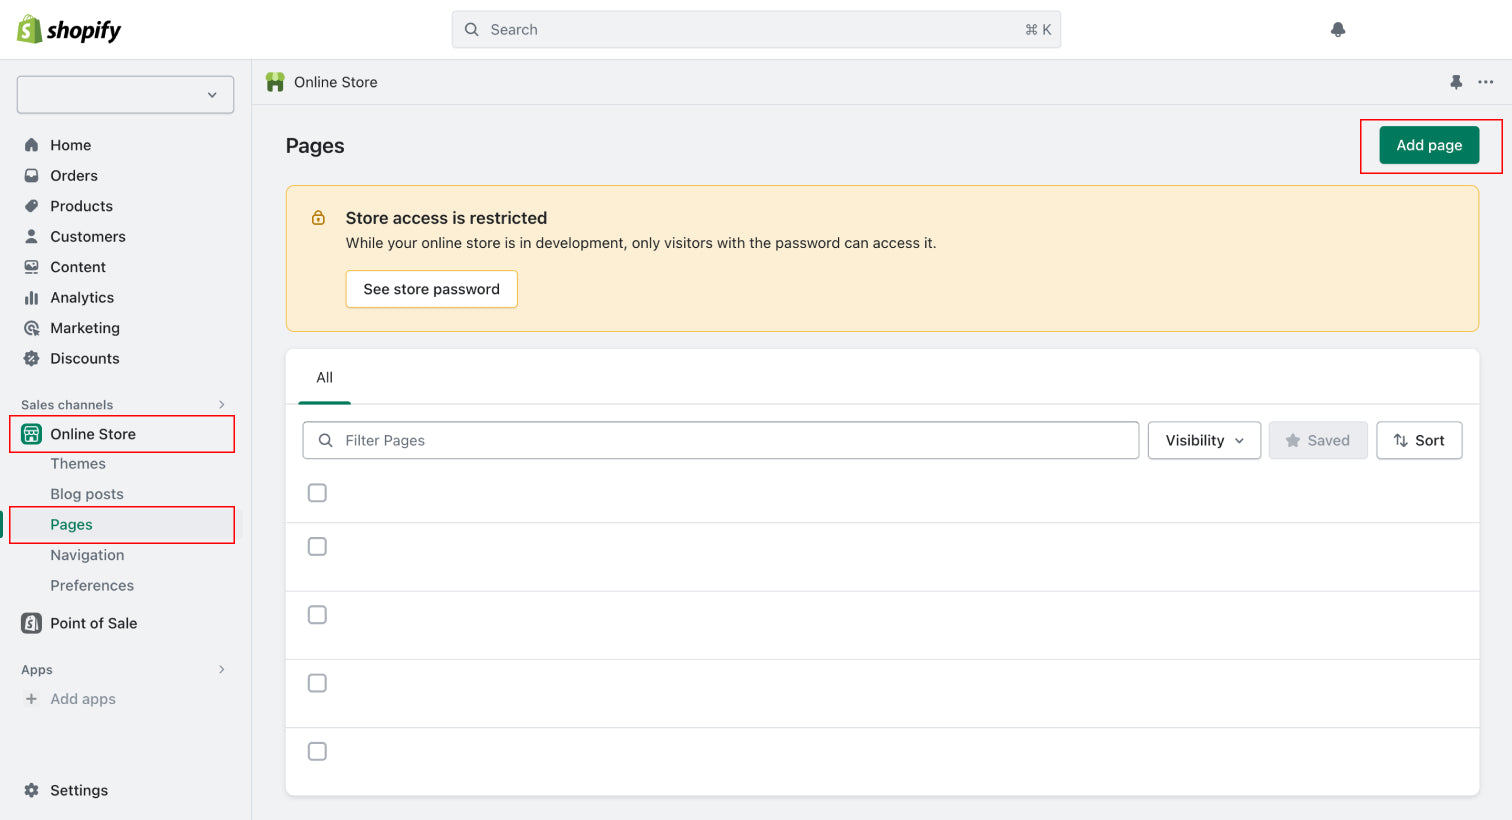
Add Page
To create a new page using the Shopify app, follow these steps:
- Access your Shopify admin.
- Navigate to Online Store > Pages.
- Choose "Add page."
- Provide a title and content for the new page.
- Click "Save".
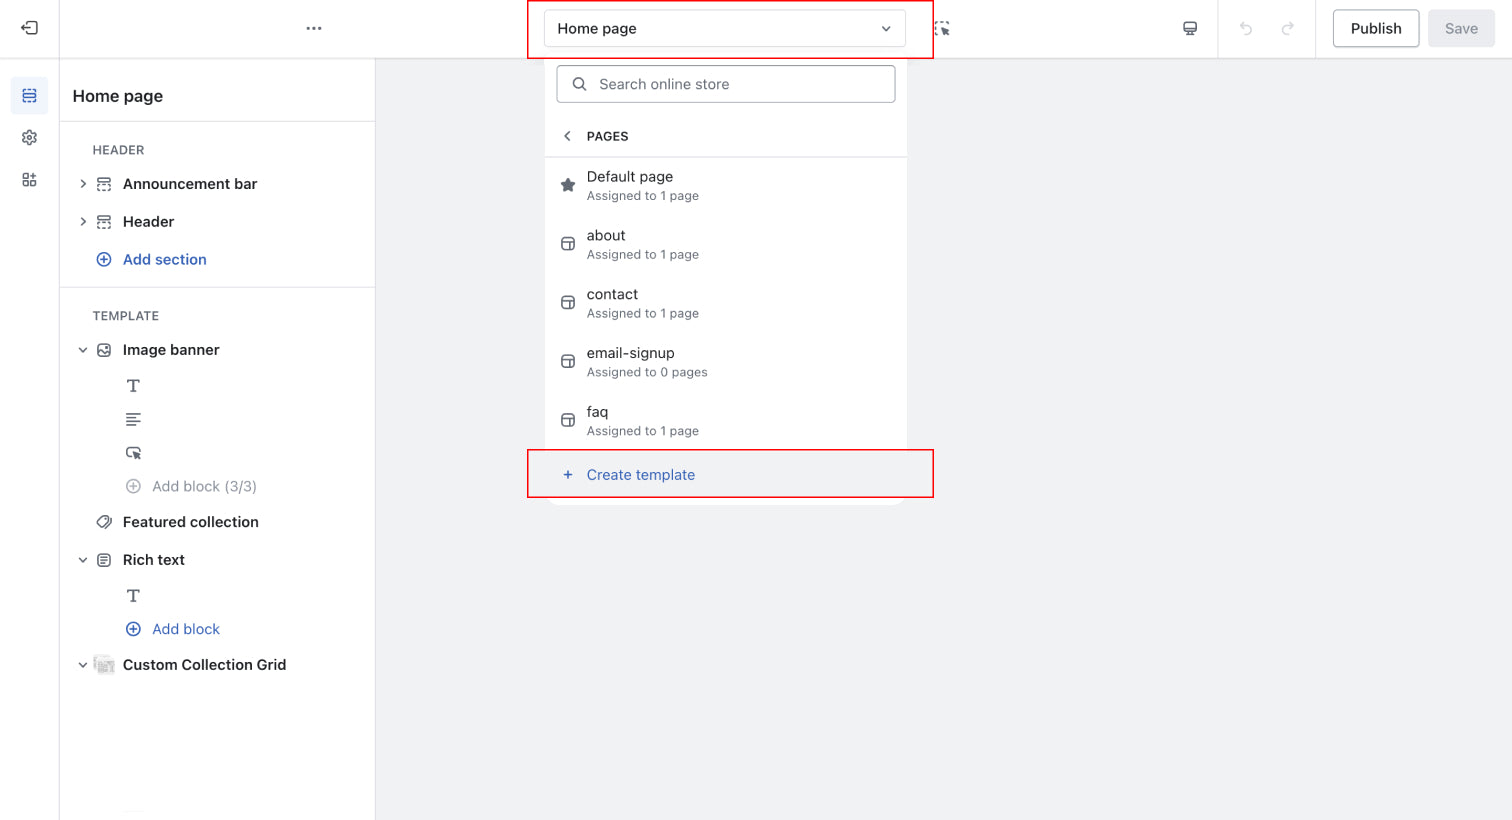
Create a Template Page
To create a new template and edit your Shopify theme, follow these steps:
- Access your Shopify admin.
- Go to Online Store > Themes.
- Locate the theme you wish to edit and click on "Customize."
- Open the drop-down menu situated at the top of the page, and then click on "+ Create template."
- Assign a unique name to your newly created template.
- From the dropdown menu, select the existing template you want to use as a basis for your new template.
- Click "Save".
*Once you have finished customising your template. it will need to be linked to a page. See next steps: Link Template to Page
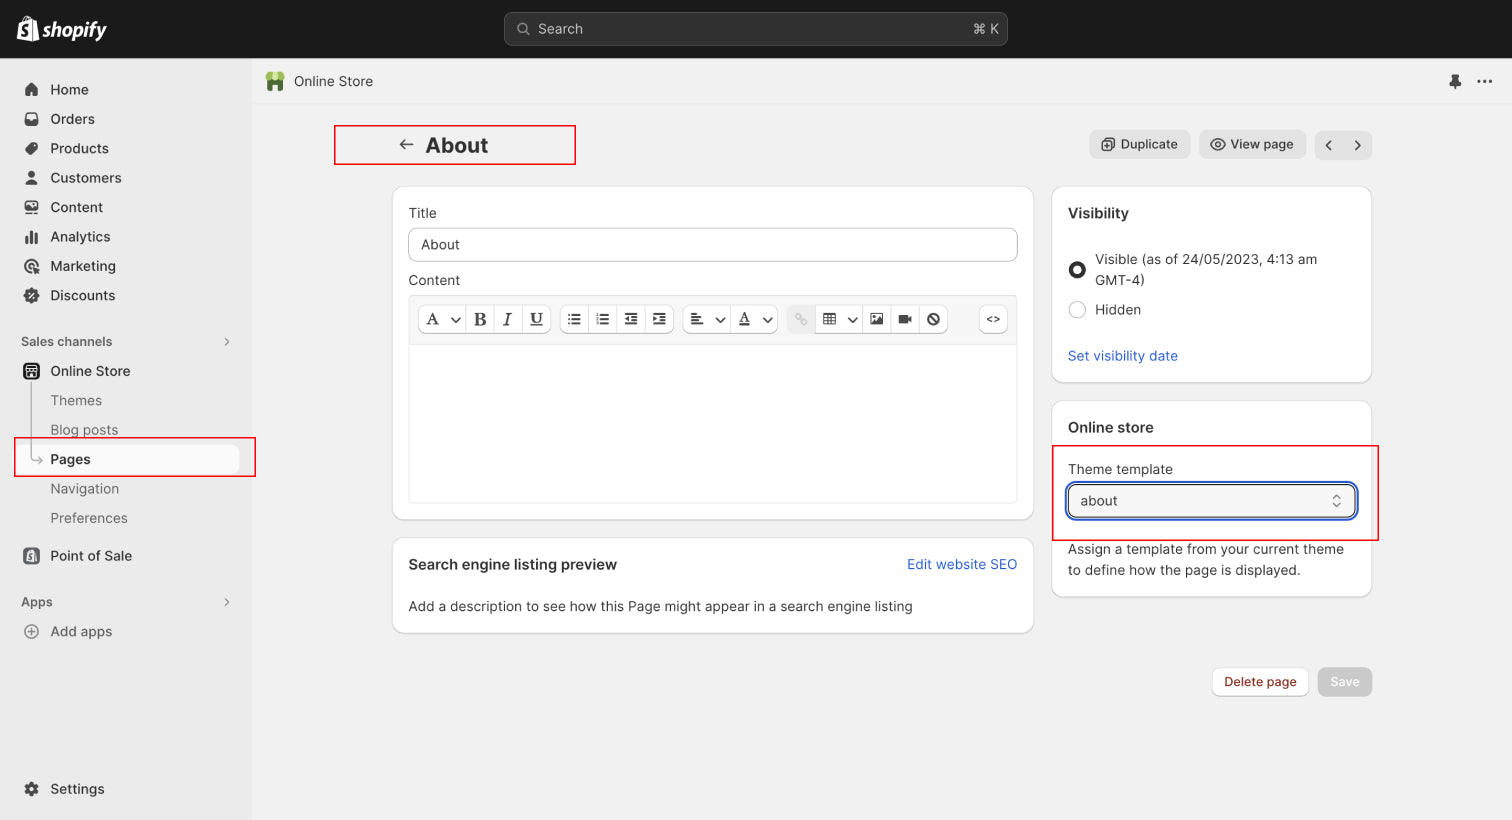
Link Template to a Page
Link template to a page
To apply a new template to a page in your Shopify store, follow these steps:
- Access your Shopify admin.
- Go to Online Store > Pages.
- Click on the title of the store page you wish to modify.
- In the Online store section, use the dropdown menu to choose a new theme template that you want to apply to the page.
- Click on "Save" to publish the changes.
Link Text Field to a Product (Metafields)
To link text to a specific product in your Shopify store, follow these steps:
- Access your Shopify admin panel.
- Navigate to Online Store > Themes.
- Click "Customize" next to the theme to enter the theme editor.
- Open the drop-down menu at the top of the page and select "Default Product."
- In the editor sidebar, select the text you want to update.
- Click the "Dynamic Source" icon above the text field.
- Under the "Product - Main Page" heading, click "Add metafield" to access your store's Product metafield settings.
- Provide a label in the "Name" field and click "Save."
- From your Shopify dashboard, go to Products.
- Choose the product you want to update and scroll to the "Metafields" section. Update the details and click "Save."
- Return to the Shopify Editor and find the text you want to edit in the sidebar. Delete its contents.
- Click the "Dynamic Source" icon above the text field and select the new metafield you created.
- Click "Save."
Launch your store
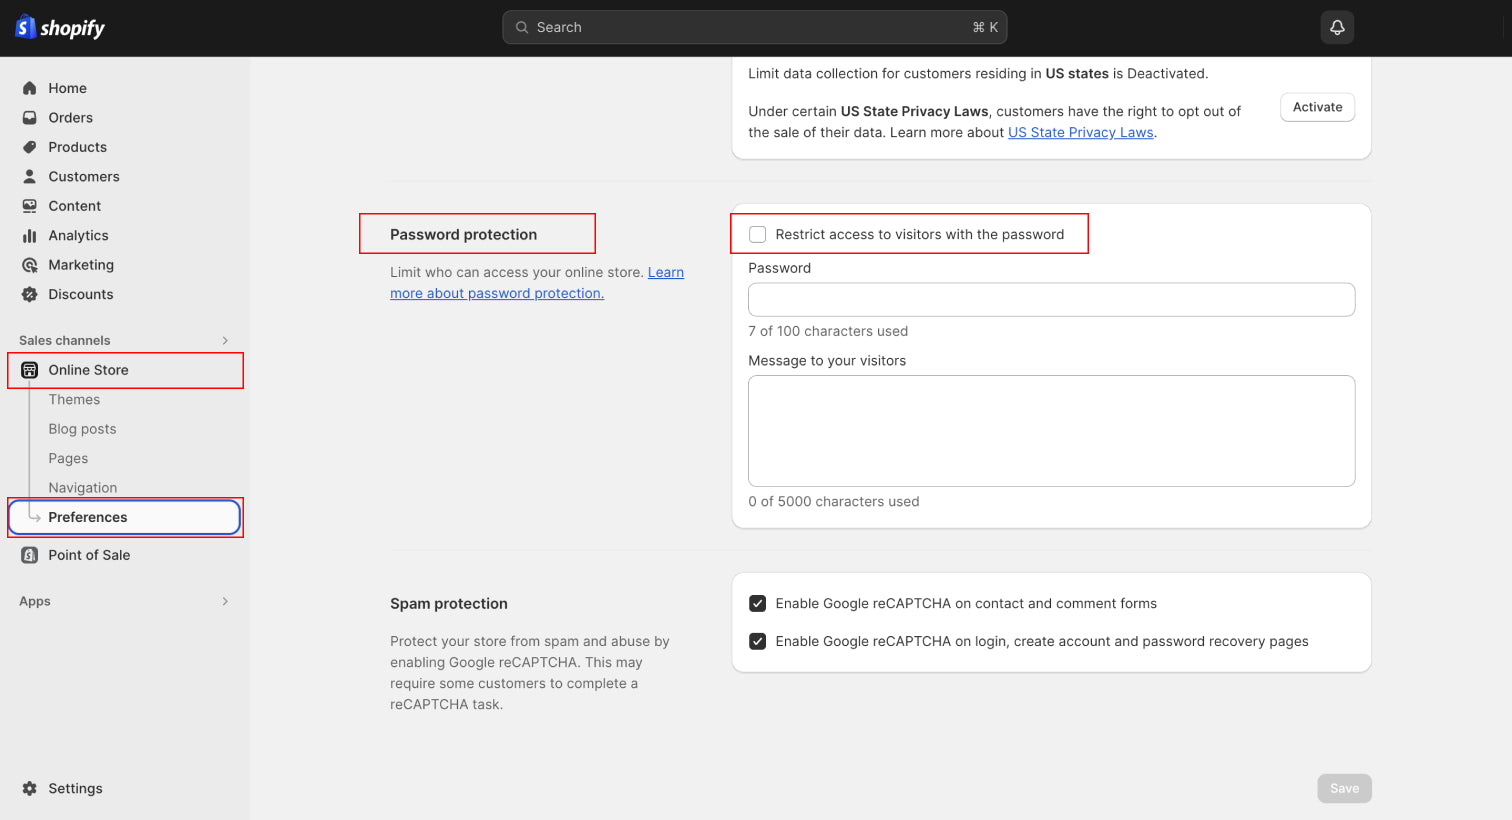
Remove password protection page
To remove password protection from your Shopify online store, follow these steps:
- Access your Shopify admin panel.
- Navigate to Online Store > Themes.
- Locate the banner showing the message "Your online store is password protected."
- Click on the option to "Remove password." This action will deactivate the password protection and enable public access to your online store.
*You can also remove the online store password from the Preferences page of your online store in your Shopify admin.
- From your Shopify admin, go to Online Store > Preferences.
- Go to the Password protection section.
- Uncheck Restrict access to visitors with the password.
- Click Save.
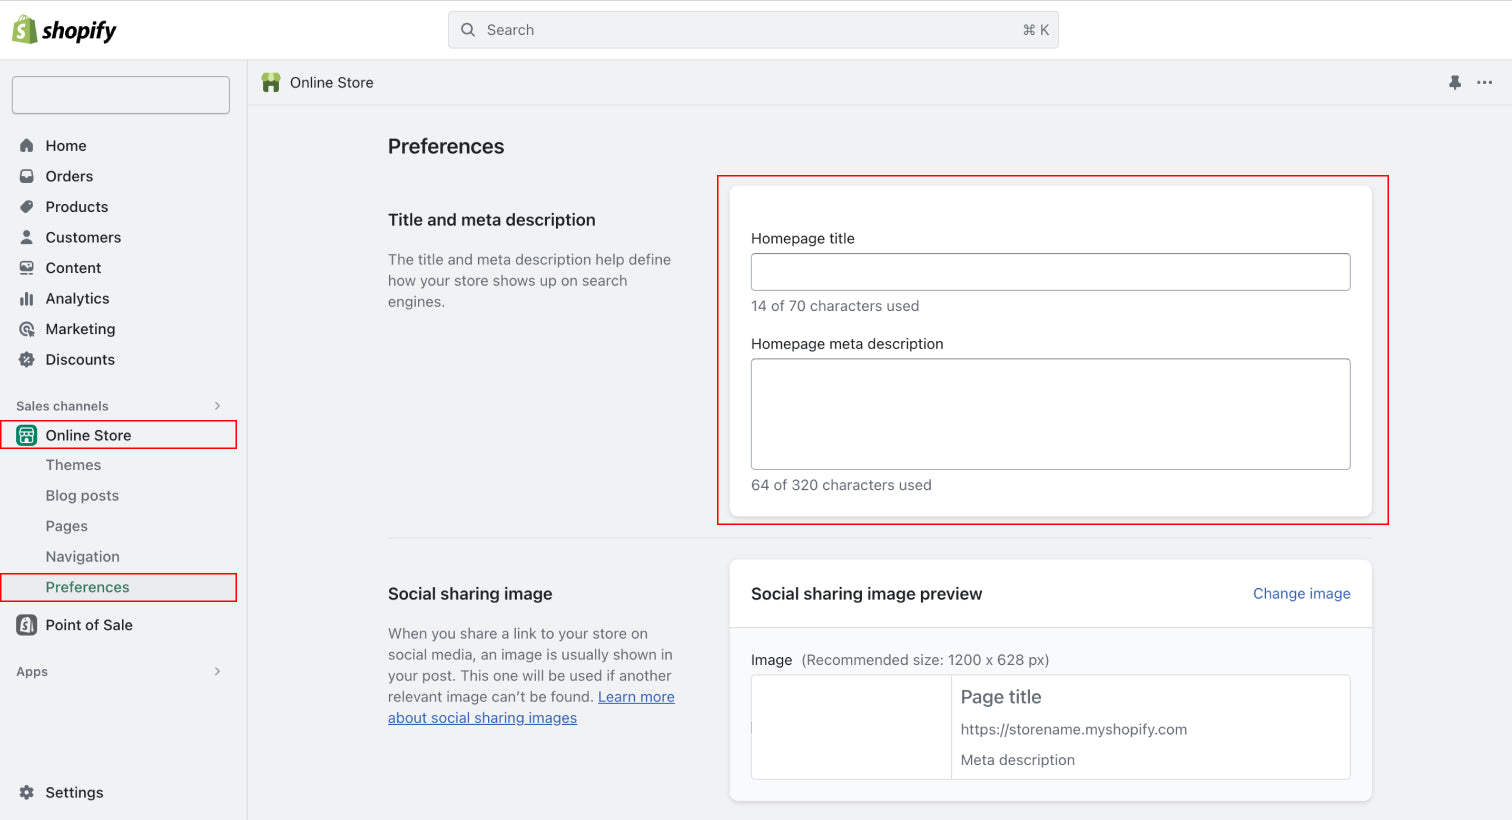
Title and meta description
To optimize your Shopify store for SEO for your home page, follow these steps:
- Access your Shopify admin panel.
- Navigate to Online Store > Preferences.
- In this section, enter a title and meta description for your store, adhering to SEO best practices to enhance search engine visibility.
- Once you've confirmed the accuracy of the information, click the "Save" button to apply the changes.
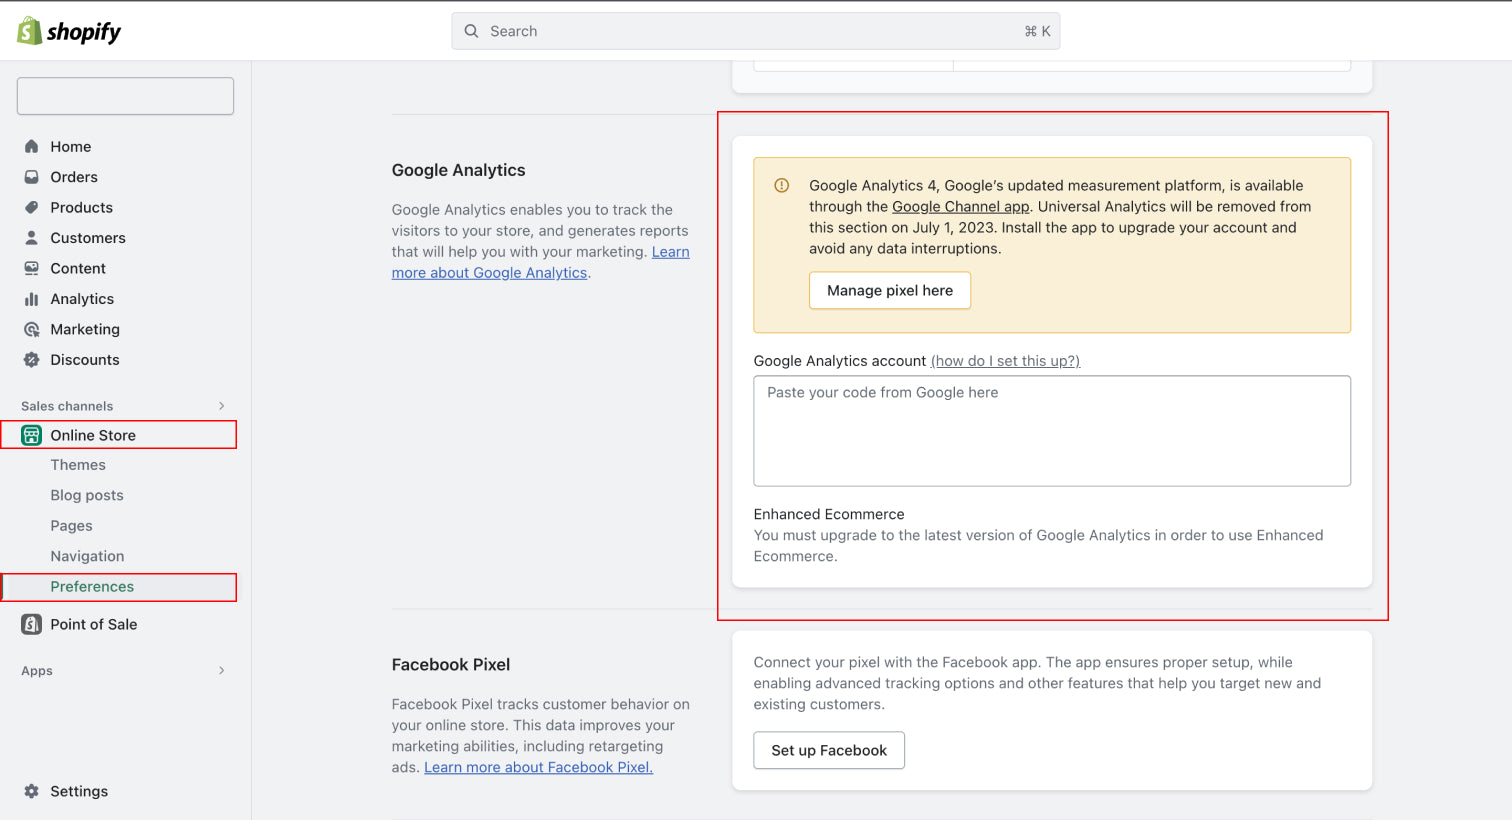
Integrate Google Analytics
To set up Google Analytics in your Shopify admin, follow these steps:
- Access your Shopify admin panel.
- Navigate to Online Store > Preferences.
- In the Google Analytics section, click on "Manage pixel here."
- Proceed to "Connect your Google account" to link your Google Analytics account with your Shopify store.
Remove blank space on the side of page
If you notice a blank space on the side of your page that causes unwanted horizontal scrolling, ensure that all placeholder images in the template are replaced with your own images or photography.